Azure Function Intune Automation: a magnificent automation implemented
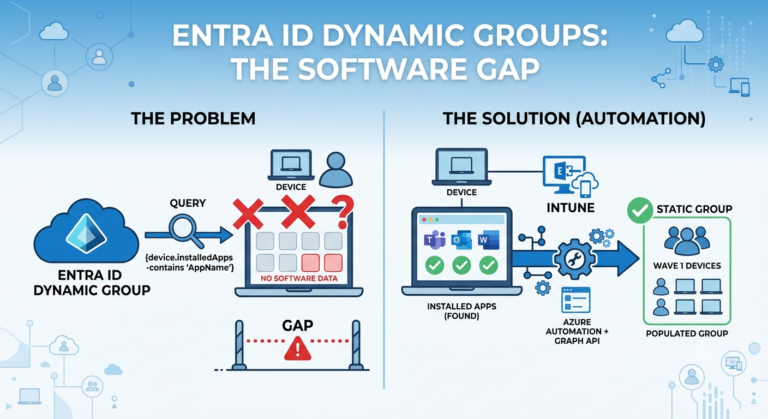
This is Part 3, the final part on Azure Function and Intune Automation. In the series on automating Intune device group membership beyond what dynamic rules can express we covered the gap itself on Part 1, Part 2 covered the cloud-only Azure Function Intune automation architecture behind it. This post is the actual implementation: every portal step with real screenshots, the full PowerShell running inside the Function, and every pitfall that cost real debugging time along the way.
Everything in Part 2 was the design. This post is building it for real, in your own tenant, following the app registration and Key Vault pattern from Part 2 rather than the Managed-Identity-direct alternative, since this is the version worth documenting end to end. If you picked the simpler route instead, most of this still applies; skip the app registration and Key Vault steps and go straight to the Function App section.
This whole series can be followed to implement Intune automations with Azure Function in general, not only for group management. So have it as a guide on your automation journey!
Table of Contents
What you’ll have by the end
The same five pieces from Part 2’s architecture diagram, built one at a time: an app registration holding Graph permissions, a Key Vault holding its client secret, a Function App whose Managed Identity can read that secret, the PowerShell that ties it together, and a target security group that gets reconciled on a schedule.
Step 1: App registration and Graph permissions
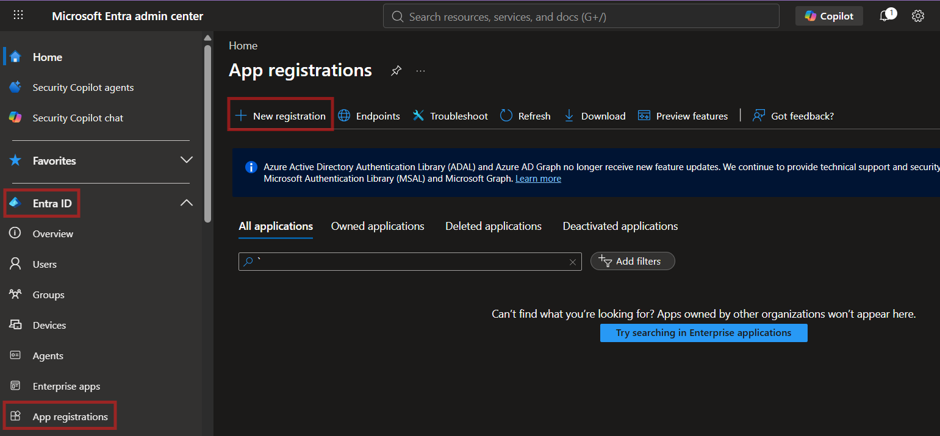
Entra admin center -> App registrations -> New registration. Single tenant is correct here, since this app only ever needs to act within your own tenant.
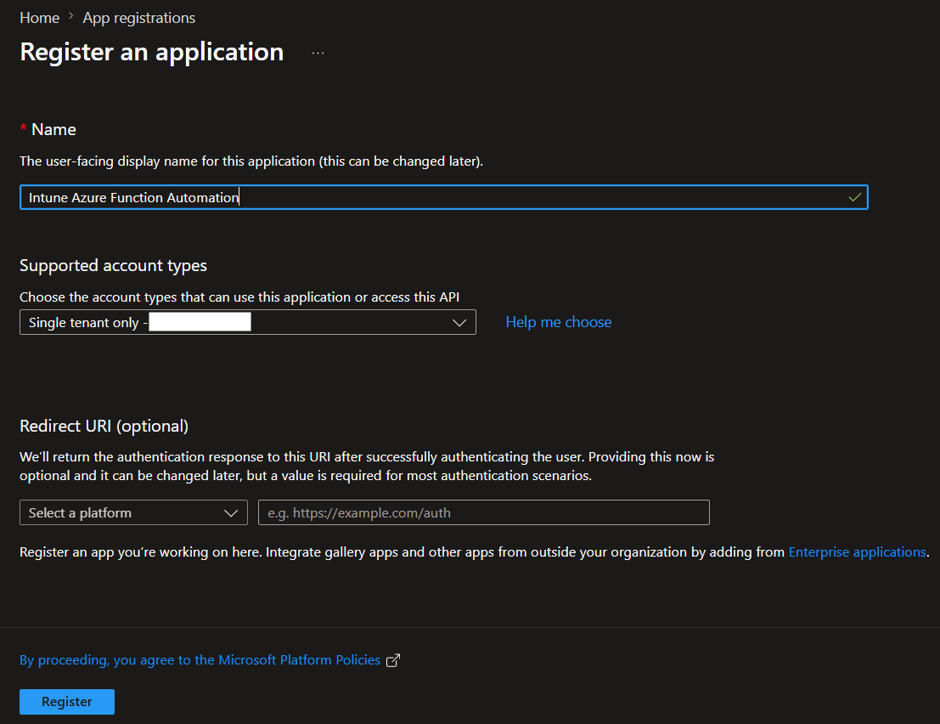
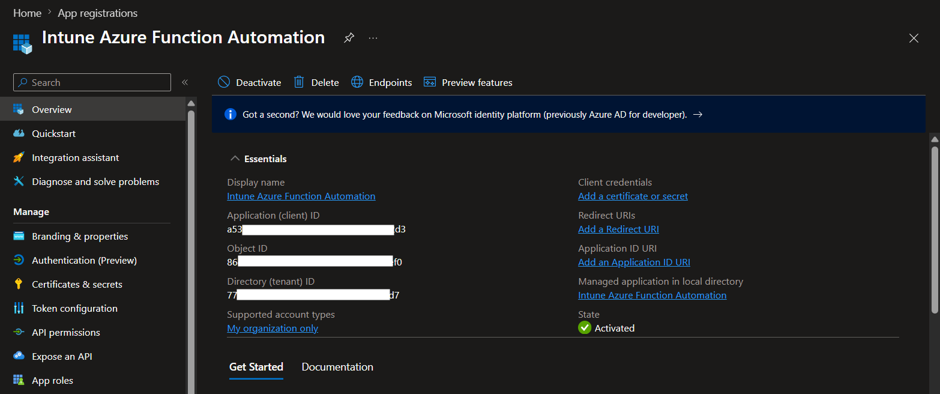
After creation, the Overview page shows the two values you’ll need shortly: the Application (client) ID and the Directory (tenant) ID.
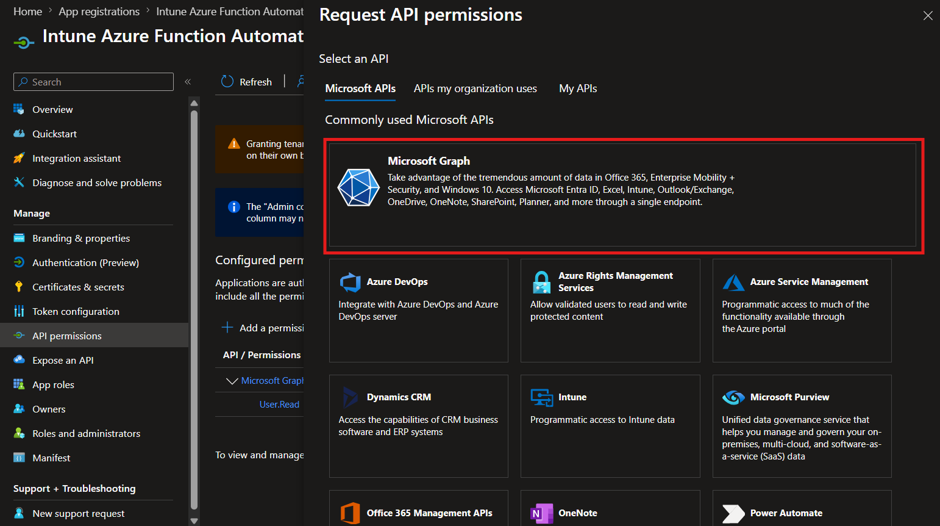
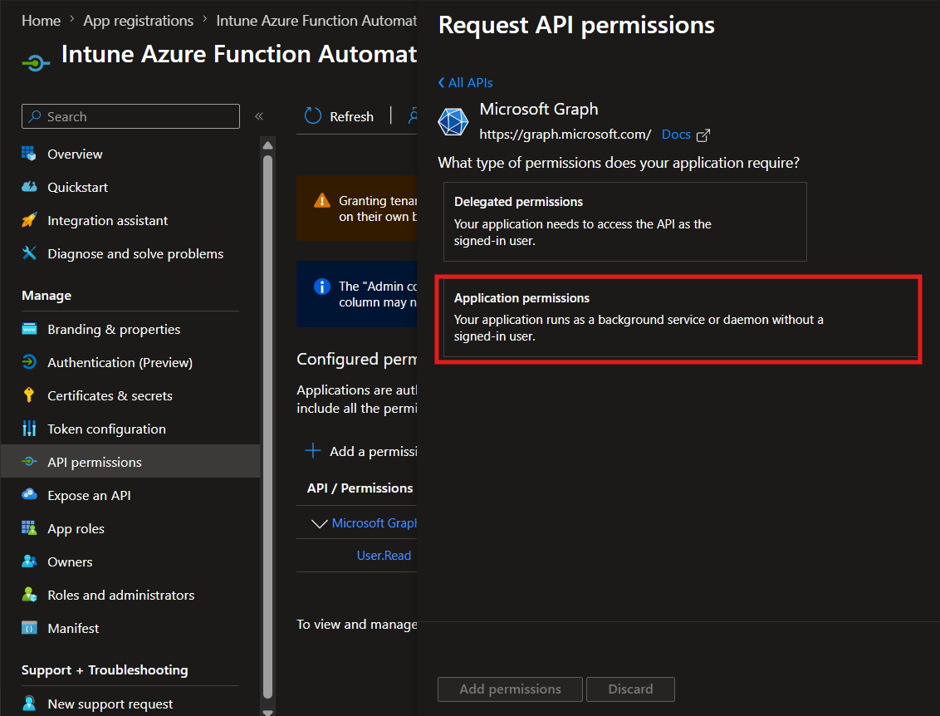
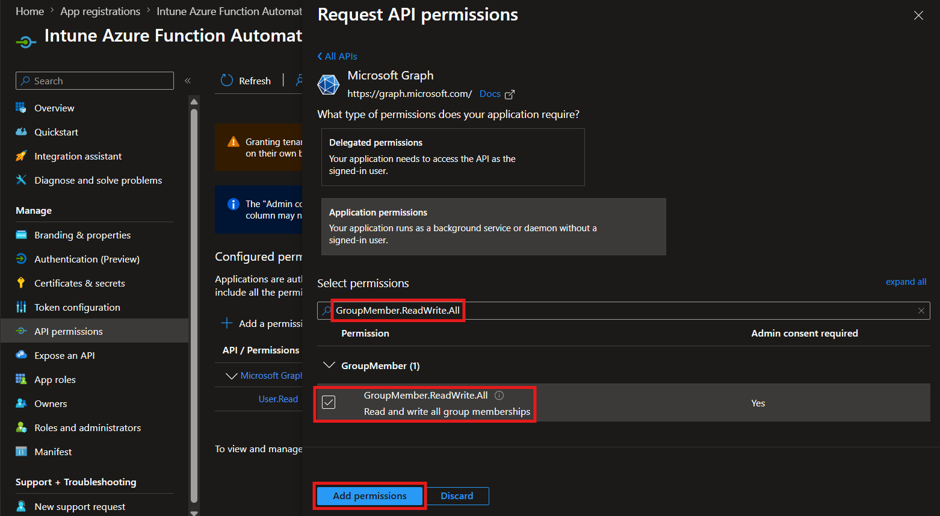
Next, API permissions -> Add a permission -> Microsoft Graph -> Application permissions (not Delegated, nothing interactive is signing in here, so the client-credentials flow this automation uses requires Application-type permissions specifically).
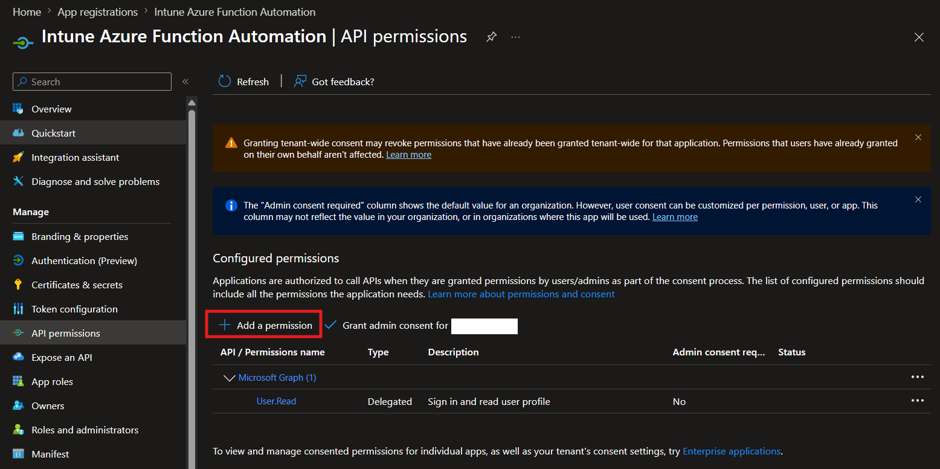
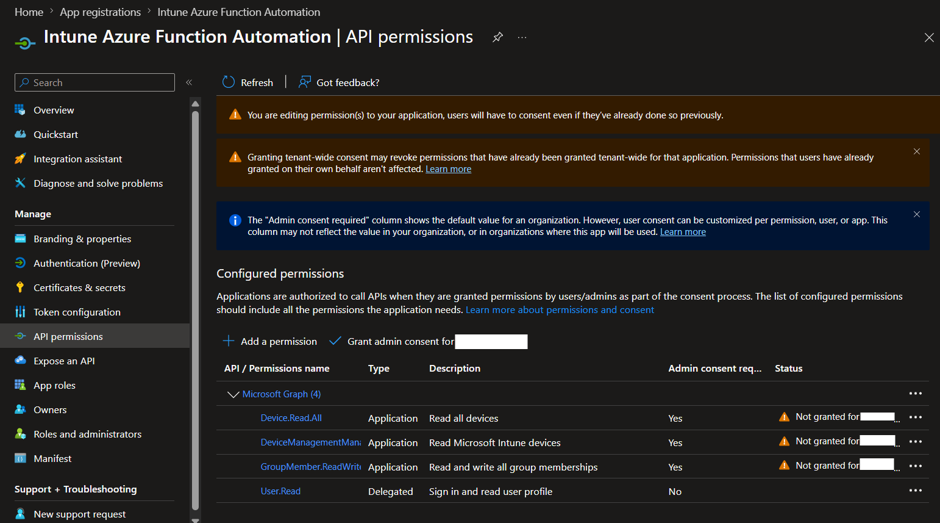
User.Read is the default permission added automatically on registration – it’s not needed for this automation and can be removed for a minimal-permission setup.
Search for and add:
- DeviceManagementManagedDevices.Read.All
- Device.Read.All
- GroupMember.ReadWrite.All
The first two look redundant at a glance, since both sound like they’re about “devices,” but they’re not interchangeable. A single physical device actually has two separate identities in Graph: an Intune managedDevice object and an Entra device object. Microsoft treats these as genuinely distinct resources with their own permission scopes, even though they describe the same machine. DeviceManagementManagedDevices.Read.All covers the Intune side (detectedApps, managedDevices); Device.Read.All covers the Entra directory side (the /devices lookup used to resolve a device’s object ID for group membership). That split is exactly why the script needs a second Graph call to bridge the two, rather than reusing data from the first call.
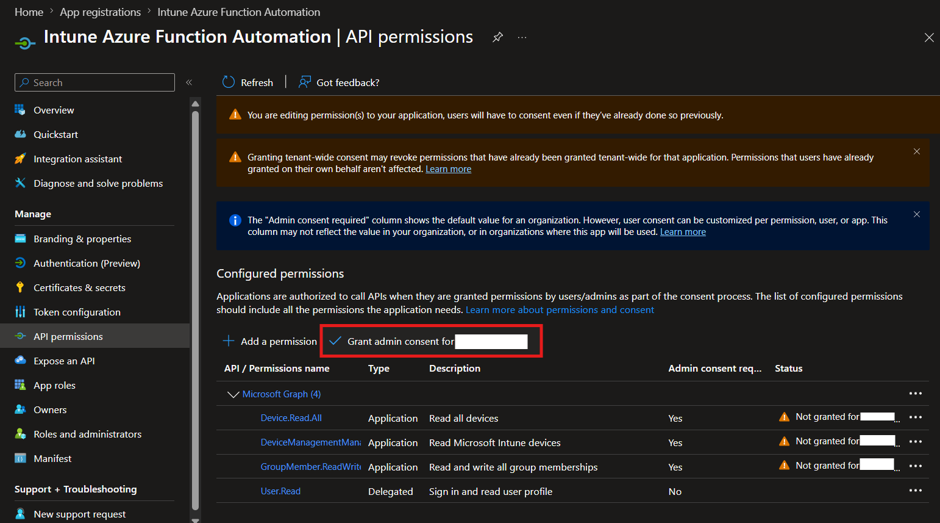
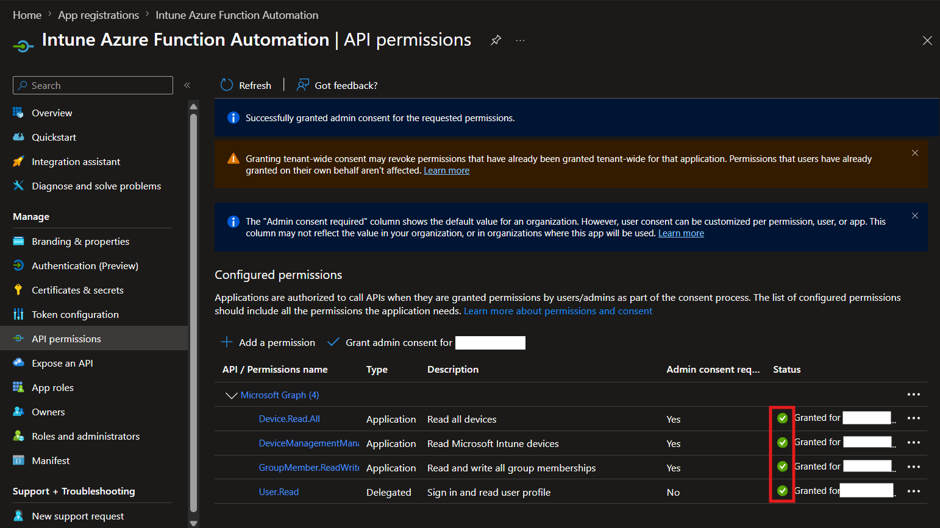
Then click Grant admin consent, which requires Global Administrator rights. The Status column must show a green checkmark next to every permission before any token this app acquires will actually be authorized to call Graph.
Pitfall: Authorization_RequestDenied, “Insufficient privileges to complete the operation,” on a token that otherwise works fine
The token is valid, but the specific Graph permission needed for that call was either never added under Application permissions (as opposed to Delegated), or was added but never actually had admin consent granted, which is distinct from just being listed on the API permissions page. Check the Status column specifically; a permission can sit there indefinitely without a green checkmark, and everything looks configured while every call using it fails.
Step 2: Client secret
Same app registration -> Certificates & secrets -> New client secret.
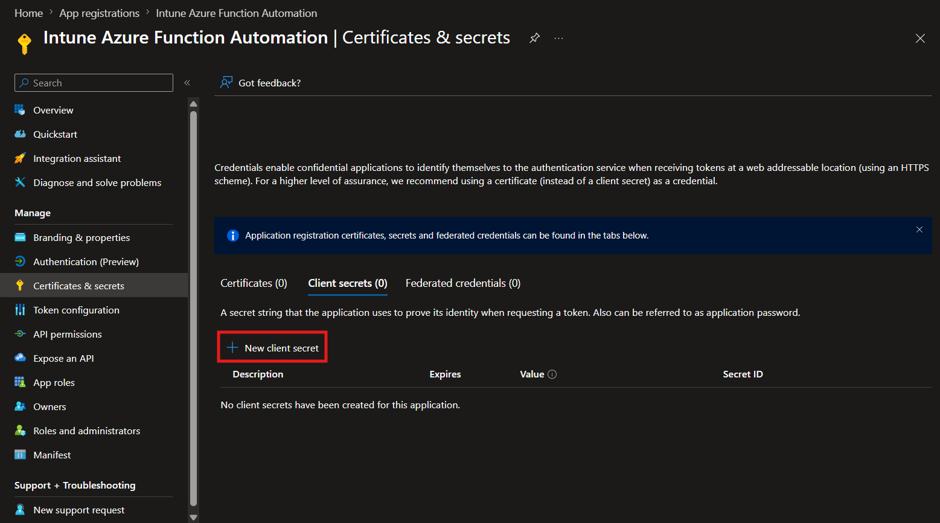
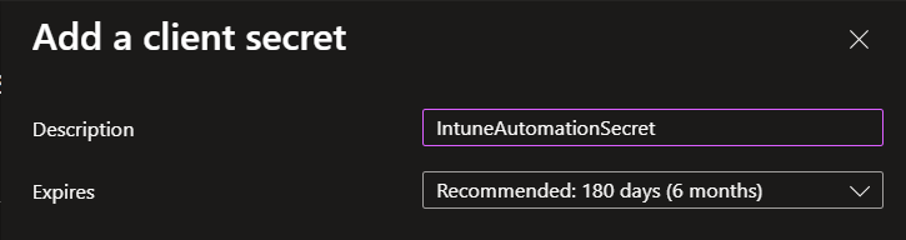
Once created, Entra shows two columns: Value and Secret ID. Copy the Value immediately; it’s shown once and masked on any later page load.
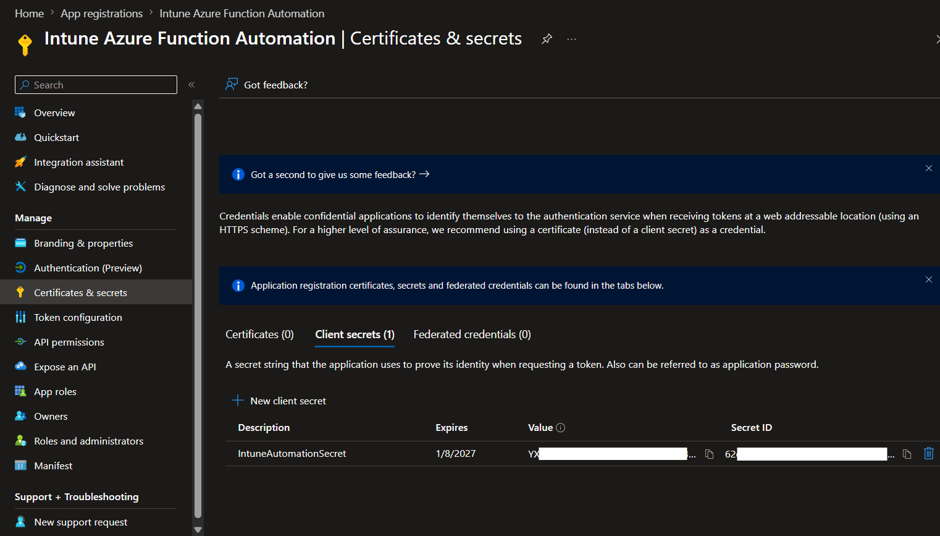
Pitfall: AADSTS7000215, “Invalid client secret provided”
This shows up later, at token request time, but it’s caused right here: pasting the Secret ID instead of the Secret Value into Key Vault in Step 6. The two are similarly-formatted random strings and easy to mix up. Make sure to copy the Value column specifically, not the Secret ID. In case you already copied the wrong one, the fix is to create a new client secret and copy the Value column immediately afterward, since it’s masked on any later page load.
Operational note: client secrets have an expiry date
The client secret has an expiry date set at creation time, visible in the portal as the Expires column next to the secret. When it expires, every Function execution will fail immediately with AADSTS7000215 – the same error that shows up if the wrong value was pasted originally. Rotating it requires no redeployment: create a new client secret in Entra (Certificates & secrets -> New client secret), copy the Value immediately, and update the secret stored in Key Vault with the new value. The Function App reads the secret from Key Vault at runtime, so the new value takes effect on the next execution automatically.
Step 3: The target security group
Entra ID -> Groups -> New group. Security type, Assigned membership, not Dynamic, the entire point of this series is managing membership through logic dynamic rules can’t express, so assigned membership is intentional here.
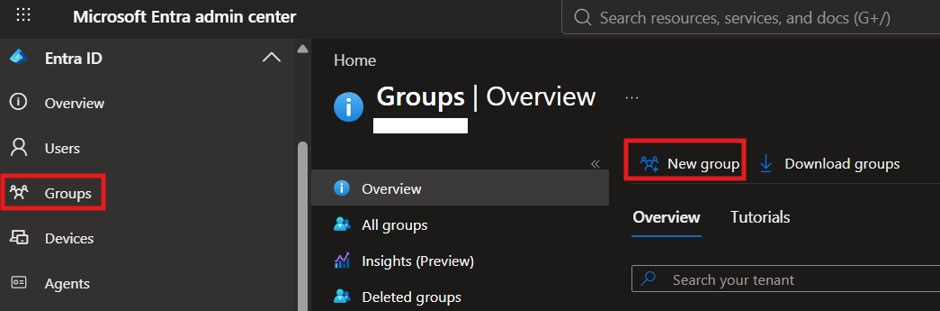
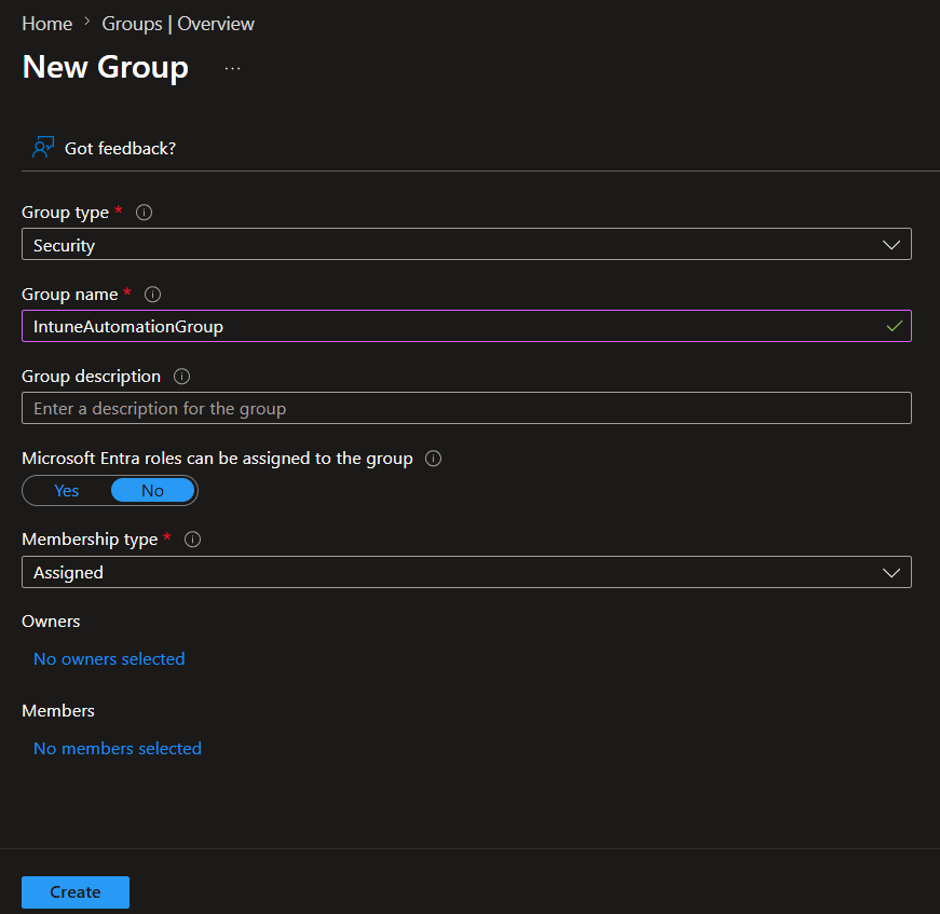
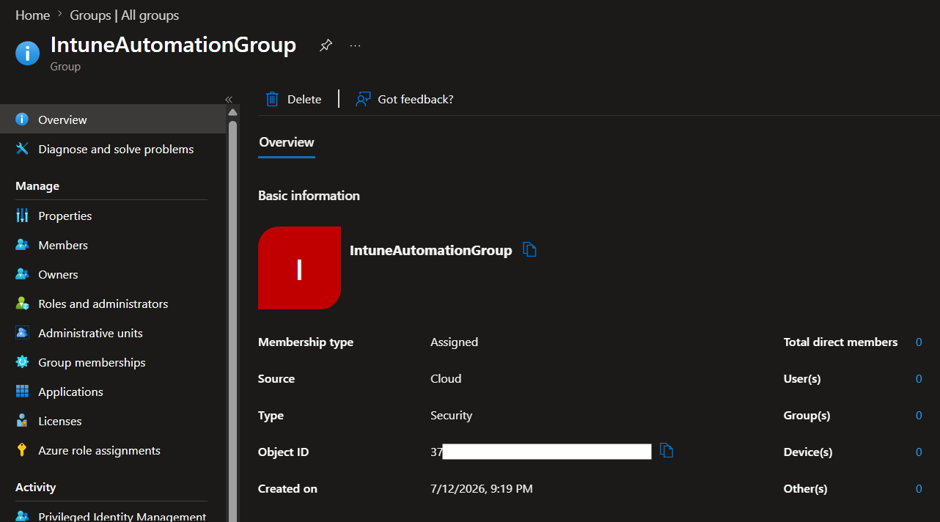
Note the Object ID; it goes into the Function’s configuration later as TARGET_GROUP_ID.
Step 4: Resource group and Key Vault
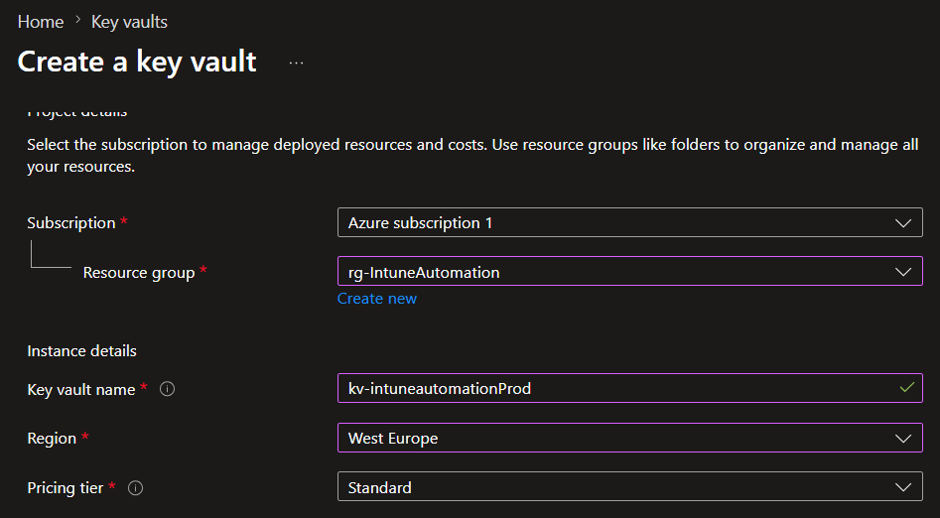
portal.azure.com -> search “Resource groups” -> + Create. A single resource group keeps everything for this automation together and easy to cost-track or tear down as a unit. Give it a name and select the desired Region.
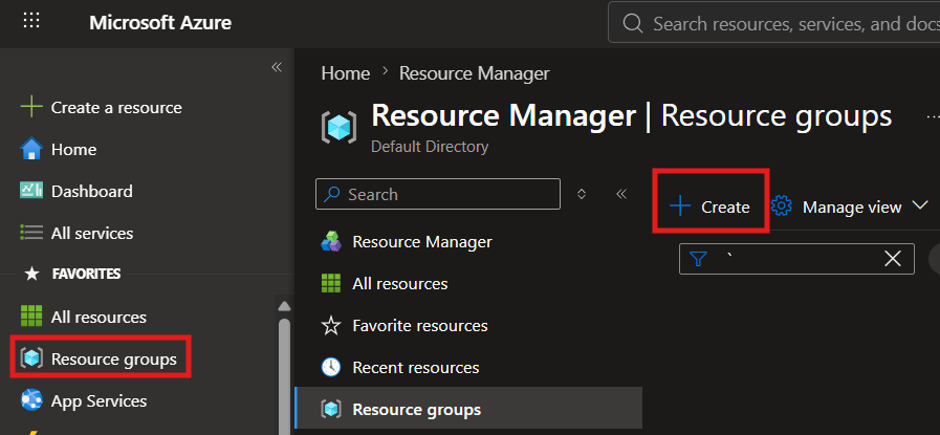
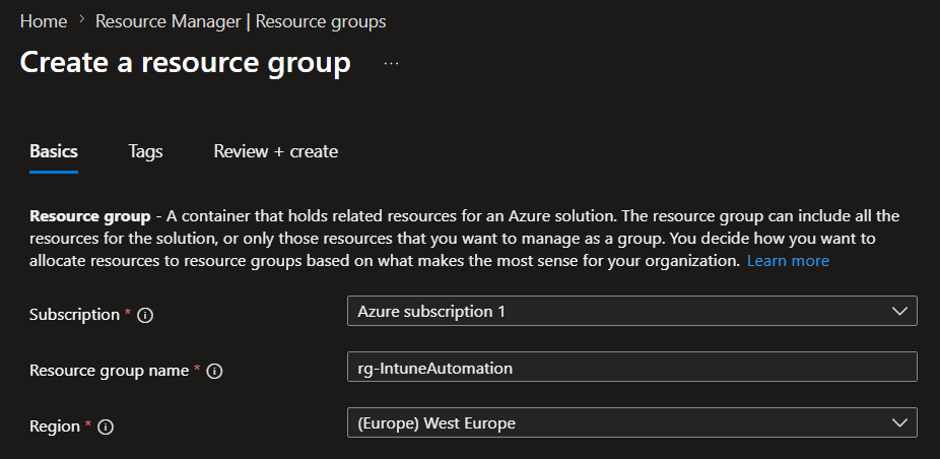
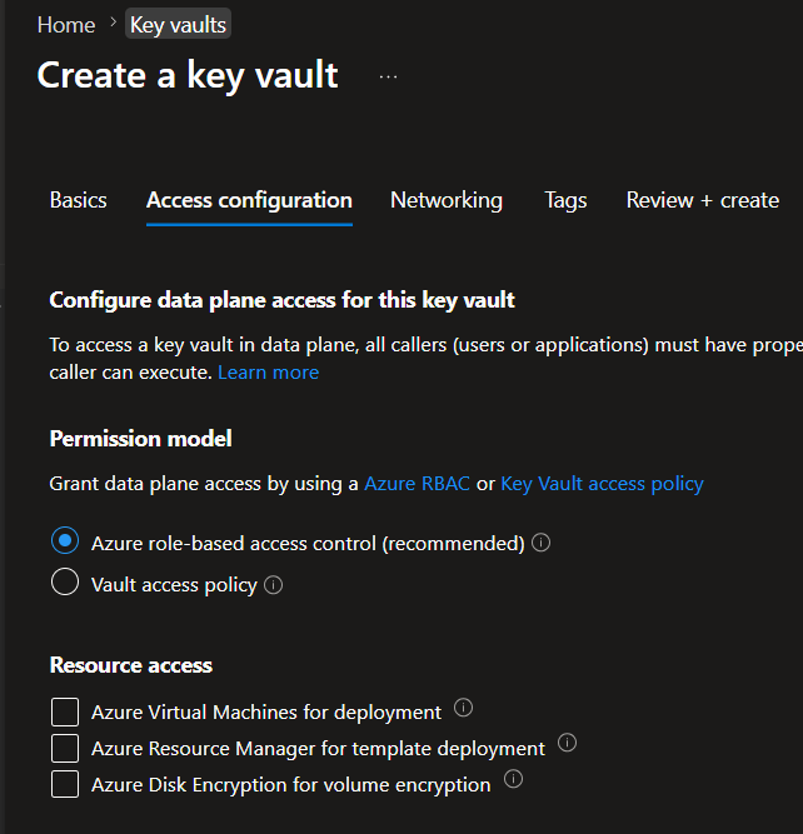
Then search for Key Vaults -> Create. Select the resource group that we previously created, give a unique name to your key vault and select the desired region. Leave the other settings to the default ones e.g. Permission model set to Azure role-based access control (RBAC), not the legacy Vault access policy model; RBAC is what the Function’s Managed Identity will use later. In case your setup requires it you can change them, but for the purpose of this blog we will just leave them with the default values.

Step 5: Granting yourself Key Vault access
Even as the resource’s owner, an RBAC-mode vault doesn’t automatically let you manage secrets through the portal; an explicit data-plane role is required. Go to the key vault that we just created: Key Vault -> Access control (IAM) -> Add role assignment.
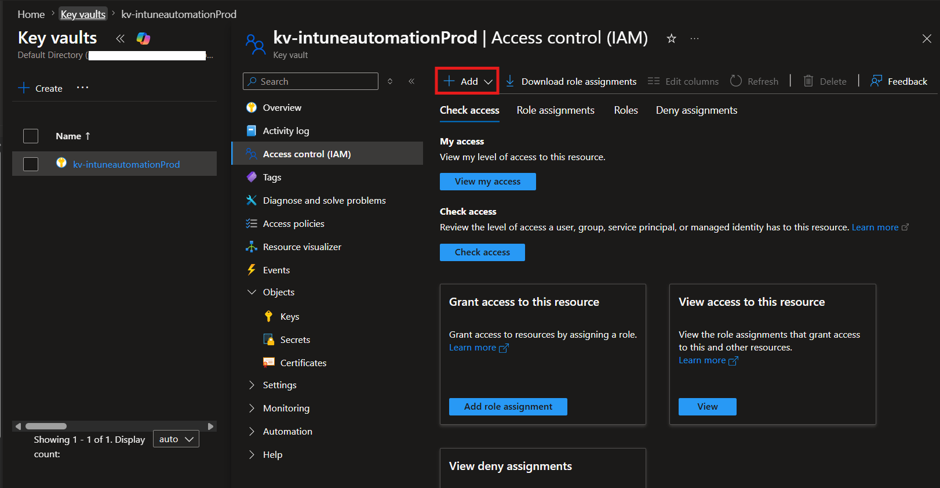
The role you want here is Key Vault Secrets Officer (create, read, and manage secrets).
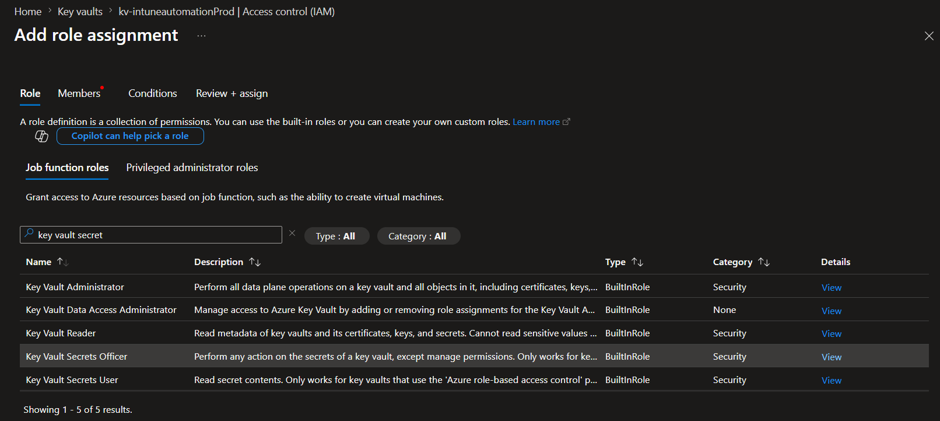
Assign it to the user that you want and click Review + assign.
Pitfall: “You are unauthorized to view these contents” on the Key Vault Secrets pane
Two separate causes produce this identical message. Either the RBAC role assignment hasn’t propagated yet, in which case waiting a minute or two and refreshing resolves it, or the wrong role was assigned entirely: Key Vault Certificates Officer instead of Key Vault Secrets Officer. The two names sit right next to each other in the role picker and are easy to mix up. Check Access control (IAM) -> Role assignments and confirm the exact role name before assuming it’s just a propagation delay.
RBAC role assignments can take a minute or two to actually propagate. If the portal says the operation isn’t allowed immediately after assigning a role, that’s normal; wait briefly and refresh before assuming something’s misconfigured.
Step 6: Storing the secret
Key Vault -> Objects -> Secrets (not Keys) -> Generate/Import.
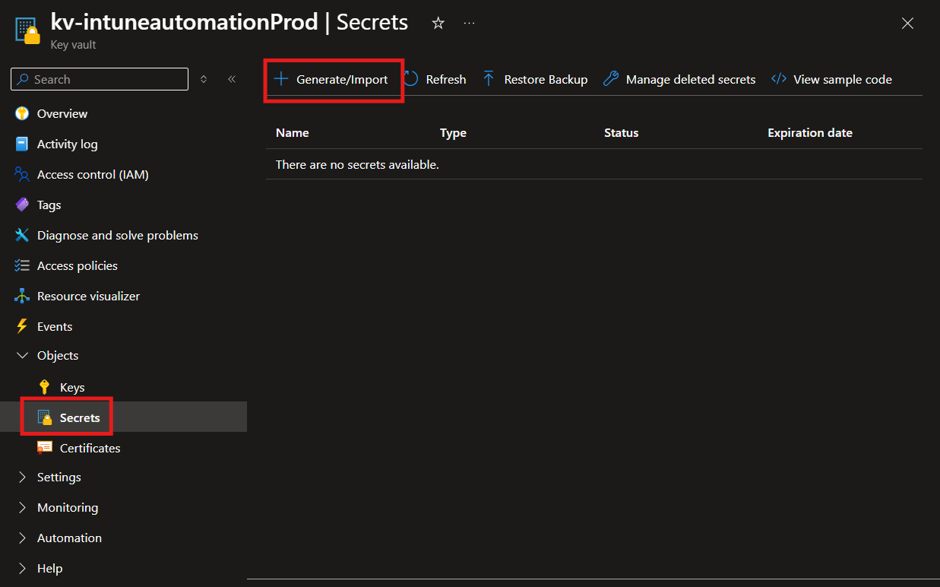
Pitfall: a secret stored in Keys instead of Secrets returns nothing useful
Key Vault’s left-hand menu has separate Keys and Secrets blades that sit right next to each other. Keys is for cryptographic keys used in encrypt/sign operations; a client secret is arbitrary text and belongs under Secrets. The two look similar enough at a glance to select the wrong one, and nothing warns you at the time.
Give the secret a name (for example graph-client-secret) and paste in the Value copied back in Step 2, not the Secret ID.
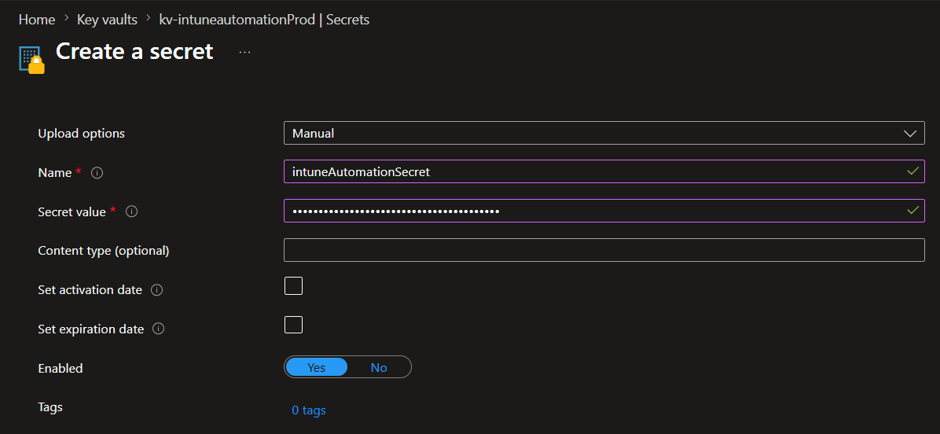
Worth a quick sanity check before moving on: click into the secret -> current version -> Show Secret Value, and confirm it matches what you copied from the app registration.
Pitfall: the secret is retrieved successfully later, but with an empty value
This one is sneaky because there’s no error at all when it happens. It comes from setting the secret with an empty or unset variable, which stores nothing meaningful without complaint. Guard against it by checking the length of a value before storing it, and lean on the verification step above (Show Secret Value in the portal) rather than trusting a script’s own success message.
Step 7: The Function App
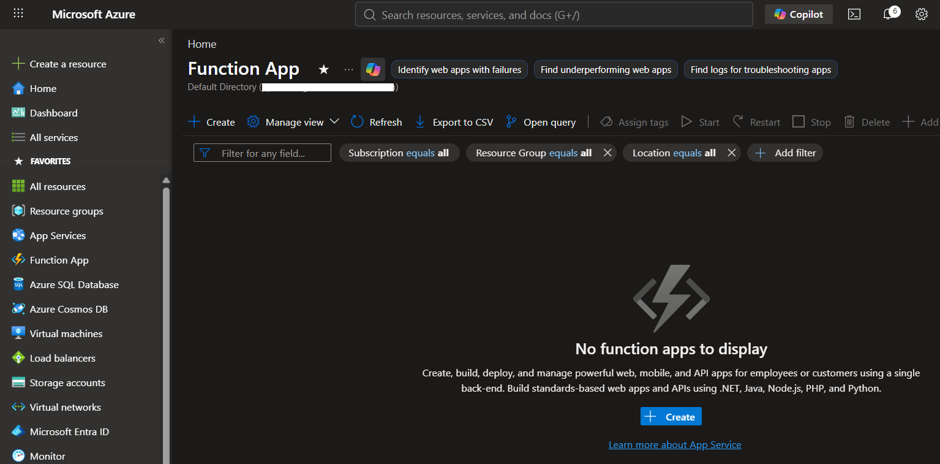
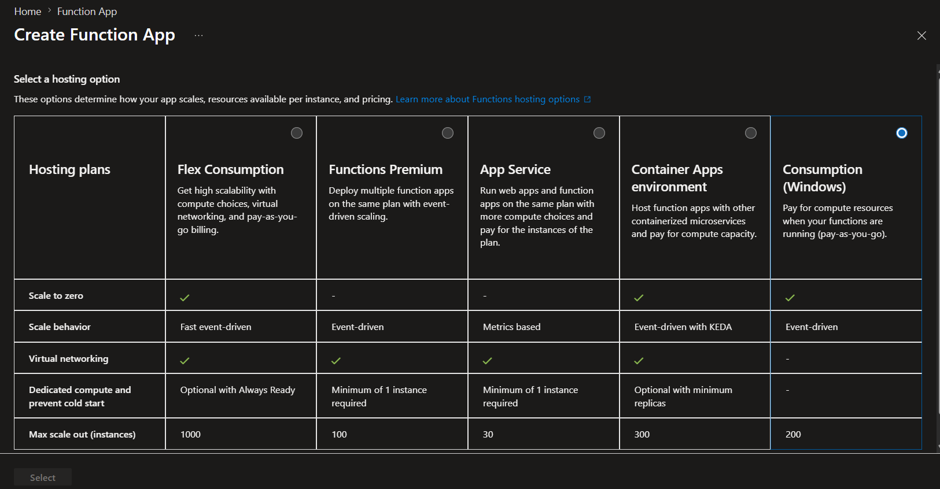
Search for Function App, select create and choose Function App on a Consumption (Windows) plan. Give a name to your function app and select the Resource Group that you want. At the bottom in the Basics page select
Runtime stack -> PowerShell
Version -> 7.4
Keep as a note that PowerShell 7.4 will reach EOL on 11/10/2026. You can create it with that version and/or choose the PowerShell 7.6 one.
Region -> The desired region.
Consumption gives true pay-per-execution: between the timer’s runs, Azure doesn’t keep any instance running at all, it shuts down to zero, and only spins one back up when the timer fires. That means no cost, and nothing running, during all the idle time between executions. Windows Consumption specifically still supports the classic managed-dependencies model, so Az.Accounts and Az.KeyVault get installed automatically from requirements.psd1 rather than needing to be manually bundled, which is the case on the newer Flex Consumption plan.
Microsoft now positions Flex Consumption as the default for new Function Apps and labels classic Consumption as legacy, but Flex Consumption still doesn’t support managed dependencies for PowerShell as of this writing, making Consumption (Windows) the more practical choice for a PowerShell-based build like this one.
To put a cost on it: at the 2-day schedule used here, the Function runs roughly 15 times per month. Each execution takes 1–5 seconds and makes around 10–20 Graph API calls. Azure Functions’ always-free tier covers 1 million executions and 400,000 GB-seconds of compute per month; this workload uses a tiny fraction of both. The realistic monthly cost of running this automation is $0 for the vast majority of tenants.
The Authentication tab (host storage, Azure Files, Application Insights connections) can stay on its default Secrets-based setting; it only affects how the Function connects to its own supporting resources, not the Managed Identity used for Key Vault, which gets configured separately next.

On the Monitoring tab, confirm Application Insights is enabled; it’s where you’ll actually read the Function’s execution logs later.
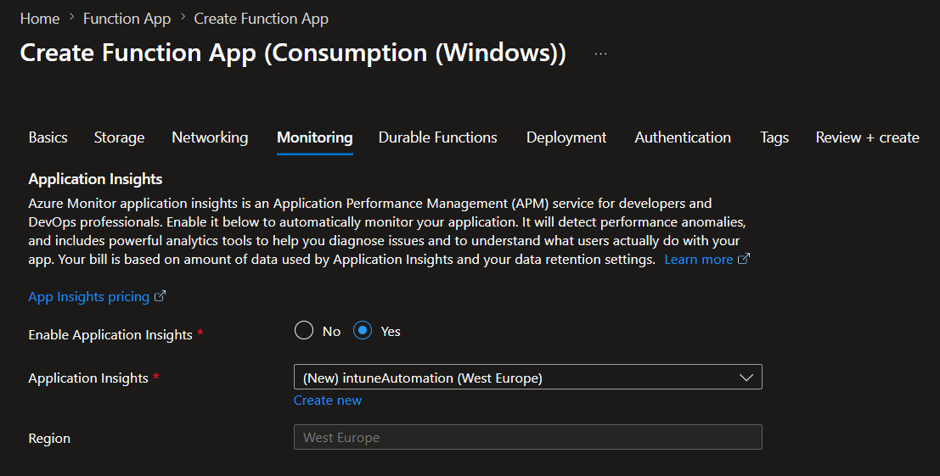
Step 8: Managed Identity, wired to Key Vault
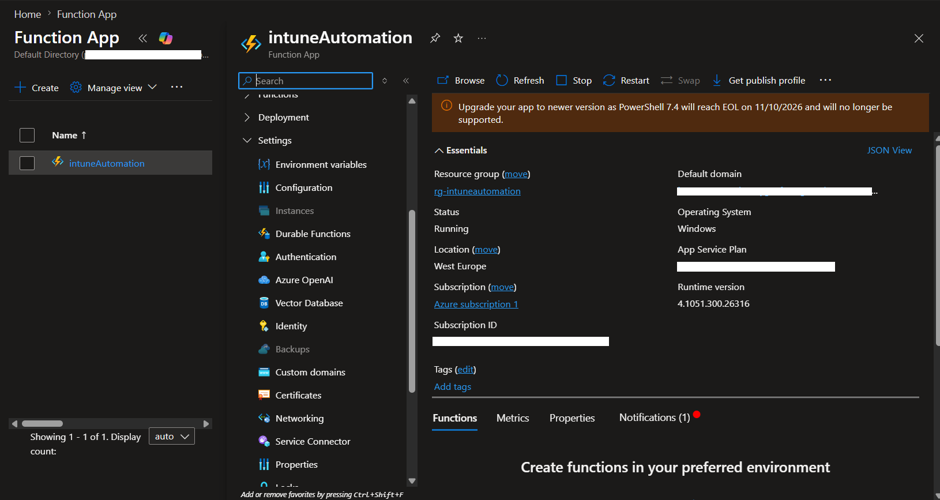
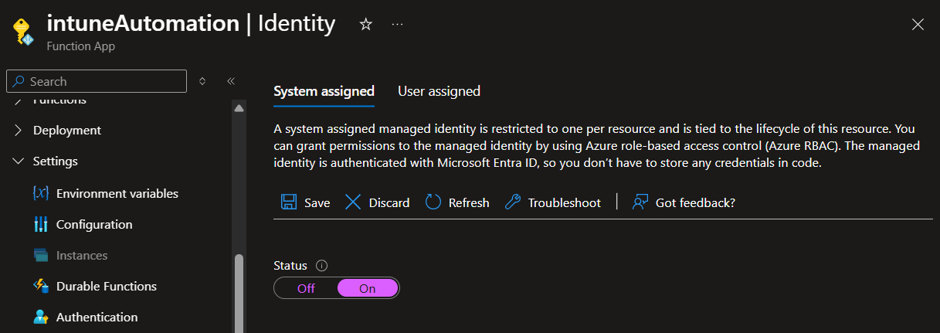
Function App -> Settings -> Identity -> System assigned tab -> Status: On -> Save.
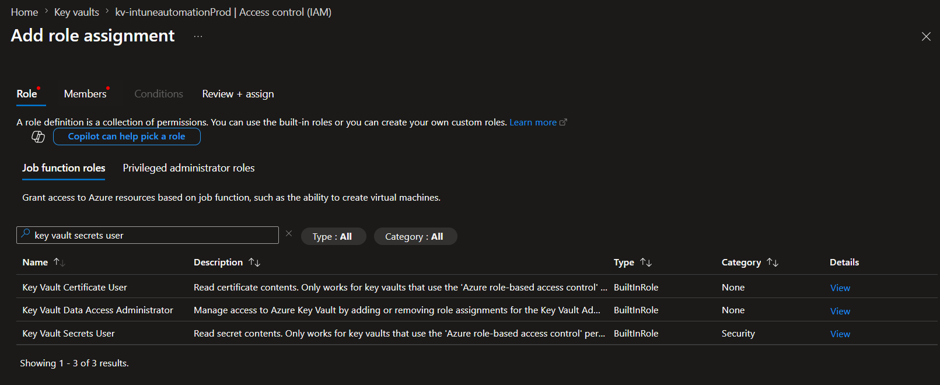
Back on the Key Vault -> Access control (IAM) -> Add role assignment, this time granting Key Vault Secrets User (read-only; the correct least-privilege fit for what the Function actually needs at runtime) to the Function App itself, found by name.
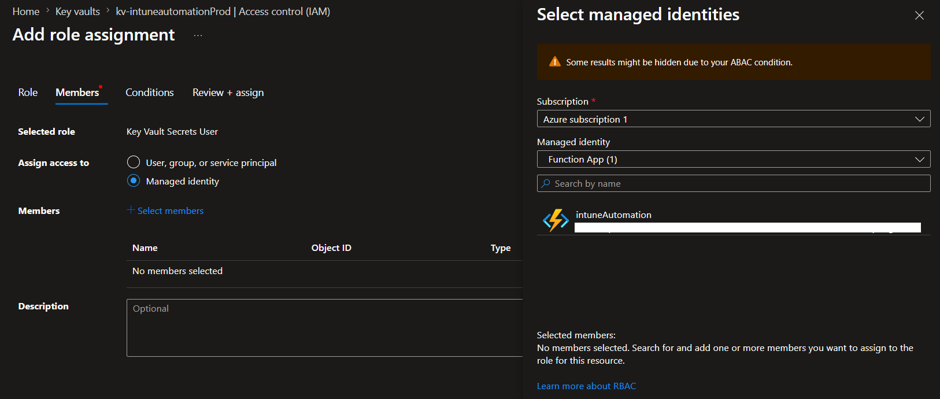
Step 9: The automation code
You can find everything below in my GitHub page too.
Four files, in a fixed folder shape the PowerShell Functions runtime expects:
/ (Function App root)
├── host.json
├── requirements.psd1
└── intuneAutomation/
    ├── function.json
    └── run.ps1
host.json – runtime-wide configuration, including enabling managed dependencies:
{
  "version": "2.0",
  "logging": {
    "applicationInsights": {
      "samplingSettings": {
        "isEnabled": true,
        "excludedTypes": "Request"
      }
    }
  },
  "extensionBundle": {
    "id": "Microsoft.Azure.Functions.ExtensionBundle",
    "version": "[4.*, 5.0.0)"
  },
  "managedDependency": {
    "enabled": true
  }
}
requirements.psd1 – declares the modules to auto-install:
@{
    'Az.Accounts'  = '3.*'
    'Az.KeyVault'  = '5.*'
}
function.json – a Timer trigger. NCRONTAB format is {second} {minute} {hour} {day} {month} {day-of-week}; every 2 days at midnight:
{
  "bindings": [
    {
      "name": "Timer",
      "type": "timerTrigger",
      "direction": "in",
      "schedule": "0 0 0 */2 * *"
    }
  ]
}
The detectedApps data this script queries doesn’t refresh anywhere near as often as a device’s general check-in. Intune’s Discovered Apps feature, which backs that Graph endpoint, refreshes on a 7-day cycle per device, counted from that device’s enrollment date, not tenant-wide and not on any daily schedule.
The one exception is Win32 apps specifically, collected via the Intune Management Extension, which refresh every 24 hours; anything querying a Win32 app can expect data at most a day old, everything else can be up to a week stale. Either way, running this Function more often than every couple of days buys nothing: the underlying data it’s reading simply hasn’t changed yet. 2 days was chosen here because the use case driving this series (gating a staged rollout) doesn’t need same-day reaction time. Tightening it later is a one-line change, not a redesign.
Breaking down our actual value, 0 0 0 */2 * *, field by field: 0 seconds, 0 minutes, 0 hours, so it fires at exactly midnight; */2 in the day field means every 2nd day of the month (1st, 3rd, 5th, and so on); * for month and day-of-week means every month, every day of the week, with no further restriction. Net effect: the Function runs once, at midnight, every other day.
One caveat worth knowing: because */2 is counted from day 1 of the month rather than from whenever the Function was last deployed, the gap between two runs isn’t always exactly 48 hours. Crossing a month boundary can occasionally produce a shorter gap (day 31 into day 1, for instance). Given the underlying data itself is only fresh to within a day or a week depending on app type, that’s not something to worry about here; it’s just not the same guarantee as a strict “every 48 hours from now” timer would give.
run.ps1 – the actual logic. Reads configuration from Application Settings, authenticates with the Function’s own Managed Identity, pulls the app registration’s secret from Key Vault, gets a Graph token via client credentials, finds devices with the target app installed, resolves each one to its Entra device object ID, diffs that against the group’s current membership, and applies only the additions and removals actually needed:
A note on Discovered Apps’ future: Microsoft has begun deprecating Discovered Apps in favor of a richer “App Inventory” feature (GA as of May 2026), and this series’ detectedApps query will need to be revisited once that transition solidifies. As of this writing, App Inventory has no confirmed, documented Microsoft Graph endpoint, so detectedApps remains the only Graph-accessible option for this pattern, but that’s worth rechecking before relying on this long-term.
param($Timer)
# ============================================================
# Sync Intune Group Membership
# Adds/removes devices from a static Entra group based on
# whether a target application is detected as installed
# (a condition dynamic membership rules cannot express).
# ============================================================
$ErrorActionPreference = "Stop"
# --- Configuration: read from Function App Application Settings, not hardcoded ---
$tenantId       = $env:TENANT_ID
$clientId       = $env:CLIENT_ID
$keyVaultName   = $env:KEY_VAULT_NAME
$secretName     = $env:KEY_VAULT_SECRET_NAME
$targetGroupId  = $env:TARGET_GROUP_ID
$targetAppName  = $env:TARGET_APP_NAME   # exact displayName as it appears in detectedApps

function Write-Log {
    param([string]$Message, [string]$Level = "INFO")
    Write-Host "[$Level] $(Get-Date -Format 'yyyy-MM-dd HH:mm:ss') - $Message"
}

function Invoke-GraphGetAll {
    param([string]$Uri, [hashtable]$Headers)
    $all = [System.Collections.Generic.List[object]]::new()
    $nextUri = $Uri
    do {
        $page = Invoke-RestMethod -Method Get -Uri $nextUri -Headers $Headers
        if ($page.value) {
            foreach ($item in $page.value) { $all.Add($item) }
        }
        $nextUri = $page.'@odata.nextLink'
    } while ($nextUri)
    return @($all)
}

# --- Step 1: Authenticate using the Function's own Managed Identity ---
Write-Log "Connecting with Managed Identity..."
Connect-AzAccount -Identity | Out-Null

# --- Step 2: Pull the app registration's client secret from Key Vault ---
Write-Log "Retrieving client secret from Key Vault..."
$clientSecret = Get-AzKeyVaultSecret -VaultName $keyVaultName -Name $secretName -AsPlainText
if ([string]::IsNullOrEmpty($clientSecret)) {
    throw "Key Vault secret '$secretName' is empty or missing."
}

# --- Step 3: Get an app-only Graph token via client credentials ---
Write-Log "Requesting Graph token..."
$tokenBody = @{
    client_id     = $clientId
    scope         = "https://graph.microsoft.com/.default"
    client_secret = $clientSecret
    grant_type    = "client_credentials"
}
$tokenResponse = Invoke-RestMethod -Method Post `
    -Uri "https://login.microsoftonline.com/$tenantId/oauth2/v2.0/token" `
    -ContentType "application/x-www-form-urlencoded" `
    -Body $tokenBody
$graphHeaders = @{ Authorization = "Bearer $($tokenResponse.access_token)" }

# --- Step 4: Find the target app's detectedApps entry ---
# detectedApps is Intune's own software inventory, already collected on the
# device's normal check-in cadence; nothing extra runs on the endpoint.
Write-Log "Looking up detectedApps entry for '$targetAppName'..."
$detectedAppsUri = "https://graph.microsoft.com/v1.0/deviceManagement/detectedApps?`$filter=displayName eq '$targetAppName'"
$detectedApps = Invoke-GraphGetAll -Uri $detectedAppsUri -Headers $graphHeaders
if ($detectedApps.Count -eq 0) {
    Write-Log "No detectedApps entry found for '$targetAppName'. Treating as zero matching devices, proceeding to reconcile (existing group members will be removed if they no longer match)." "WARN"
}
# An app can have multiple detectedApps entries across versions; union all of them.
$deviceIdsWithApp = New-Object System.Collections.Generic.HashSet[string]
foreach ($app in $detectedApps) {
    $managedDevicesUri = "https://graph.microsoft.com/v1.0/deviceManagement/detectedApps/$($app.id)/managedDevices?`$select=id,deviceName"
    $devicesForApp = Invoke-GraphGetAll -Uri $managedDevicesUri -Headers $graphHeaders
    foreach ($d in $devicesForApp) {
        # The detectedApps navigation doesn't expose azureADDeviceId directly;
        # look it up via the full managedDevices resource, which does.
        $fullDeviceUri = "https://graph.microsoft.com/v1.0/deviceManagement/managedDevices/$($d.id)?`$select=azureADDeviceId,deviceName"
        try {
            $fullDevice = Invoke-RestMethod -Method Get -Uri $fullDeviceUri -Headers $graphHeaders
            if (-not [string]::IsNullOrEmpty($fullDevice.azureADDeviceId)) {
                [void]$deviceIdsWithApp.Add($fullDevice.azureADDeviceId)
            } else {
                Write-Log "Device '$($fullDevice.deviceName)' has no azureADDeviceId, skipping." "WARN"
            }
        }
        catch {
            Write-Log "Could not resolve managed device $($d.id): $($_.Exception.Message)" "WARN"
        }
    }
}
Write-Log "Found $($deviceIdsWithApp.Count) device(s) with '$targetAppName' installed."

# --- Step 5: Resolve azureADDeviceId to the Entra device object ID ---
# Group membership operations need the device object's own "id", which is
# different from azureADDeviceId (the device's deviceId property).
function Get-EntraDeviceObjectId {
    param([string]$AzureAdDeviceId)
    $uri = "https://graph.microsoft.com/v1.0/devices?`$filter=deviceId eq '$AzureAdDeviceId'&`$count=true"
    $advancedHeaders = $graphHeaders + @{ ConsistencyLevel = "eventual" }
    $result = Invoke-RestMethod -Method Get -Uri $uri -Headers $advancedHeaders
    if ($result.value.Count -gt 0) { return $result.value[0].id }
    return $null
}
$targetObjectIds = New-Object System.Collections.Generic.HashSet[string]
foreach ($aadId in $deviceIdsWithApp) {
    $objectId = Get-EntraDeviceObjectId -AzureAdDeviceId $aadId
    if ($objectId) { [void]$targetObjectIds.Add($objectId) }
    else { Write-Log "Could not resolve device object ID for azureADDeviceId $aadId" "WARN" }
}

# --- Step 6: Get current group membership ---
Write-Log "Retrieving current members of target group..."
$currentMembersUri = "https://graph.microsoft.com/v1.0/groups/$targetGroupId/members?`$select=id"
$currentMembers = Invoke-GraphGetAll -Uri $currentMembersUri -Headers $graphHeaders
$currentMemberIds = New-Object System.Collections.Generic.HashSet[string]
foreach ($m in $currentMembers) { [void]$currentMemberIds.Add($m.id) }

# --- Step 7: Diff, so repeated runs only touch what actually changed ---
$toAdd    = $targetObjectIds | Where-Object { -not $currentMemberIds.Contains($_) }
$toRemove = $currentMemberIds | Where-Object { -not $targetObjectIds.Contains($_) }
Write-Log "Devices to add: $($toAdd.Count) | Devices to remove: $($toRemove.Count)"

# --- Step 8: Apply additions ---
foreach ($deviceObjectId in $toAdd) {
    try {
        $addBody = @{ "@odata.id" = "https://graph.microsoft.com/v1.0/directoryObjects/$deviceObjectId" } | ConvertTo-Json
        Invoke-RestMethod -Method Post `
            -Uri "https://graph.microsoft.com/v1.0/groups/$targetGroupId/members/`$ref" `
            -Headers ($graphHeaders + @{ "Content-Type" = "application/json" }) `
            -Body $addBody
        Write-Log "Added device $deviceObjectId to group."
    }
    catch {
        Write-Log "Failed to add device $deviceObjectId : $($_.Exception.Message)" "ERROR"
    }
}

# --- Step 9: Apply removals ---
foreach ($deviceObjectId in $toRemove) {
    try {
        Invoke-RestMethod -Method Delete `
            -Uri "https://graph.microsoft.com/v1.0/groups/$targetGroupId/members/$deviceObjectId/`$ref" `
            -Headers $graphHeaders
        Write-Log "Removed device $deviceObjectId from group."
    }
    catch {
        Write-Log "Failed to remove device $deviceObjectId : $($_.Exception.Message)" "ERROR"
    }
}
Write-Log "Reconciliation complete."
Pitfall: Request_UnsupportedQuery, “An empty filter value is not supported”
This shows up two steps later, when resolving each device’s Entra object ID, but the root cause is here. Graph’s detectedApps/{id}/managedDevices navigation returns a restricted device projection that doesn’t include azureADDeviceId, no matter what’s requested via $select on that call. The fix, already reflected in the code above, is a second call per device against the full managedDevices resource (/deviceManagement/managedDevices/{id}?$select=azureADDeviceId), where that field is actually available. Without it, azureADDeviceId comes back blank and the next step’s filter fails with an unhelpful error that doesn’t point back here at all.
Pitfall: Request_UnsupportedQuery, “Unsupported or invalid query filter clause specified for property ‘deviceId'”
Filtering /devices by deviceId requires Graph’s advanced query support, which needs the explicit ConsistencyLevel: eventual header plus $count=true in the URL, both already in the function above. Without both, Graph rejects the filter outright, and the error message doesn’t mention either requirement, so it reads like the filter syntax itself is wrong when it isn’t.
Step 10: Deploying and configuring
This step assumes a genuinely empty machine. Three tools need installing before any deployment command works at all: Node.js, Azure Functions Core Tools, and Azure CLI. If any of these are already installed, skip straight to the part that’s missing.
Install Node.js
Download the current LTS release from nodejs.org and run the installer with its defaults. Core Tools sometimes lags behind the very newest Node release, so stick to the LTS line rather than whatever the absolute latest version happens to be.
Verify it installed:
node --version
npm --version
Both should return a version number.
Install Azure Functions Core Tools (this is what gives you the func command):
npm install -g azure-functions-core-tools@4
# Verify, may require to close and reopen PowerShell session
func --version
Install Azure CLI (this is what gives you the az command):
cd C:\Temp
Invoke-WebRequest -Uri https://aka.ms/installazurecliwindows -OutFile .\AzureCLI.msi
Start-Process msiexec.exe -Wait -ArgumentList '/I AzureCLI.msi /quiet'
Open a fresh terminal window after this finishes, then verify:
az --version
Pitfall: func or az still “not recognized” right after installing, especially in VS Code
This is almost always a stale PATH, not a failed install. A new terminal tab inherits VS Code’s PATH from when the application itself was launched, so it won’t pick up anything installed since. Closing the terminal panel isn’t enough; fully quit VS Code (not just the terminal) and reopen it. If it still fails in a completely fresh, non-VS-Code PowerShell window too, the install itself didn’t complete and is worth rerunning.
With all three tools verified, deploy the actual function. From the folder containing host.json, requirements.psd1, and the intuneAutomation folder:
az login
func azure functionapp publish <your-function-app-name> --powershell az login
opens a browser window to sign in normally. If it fails with an interactive authentication error instead (more likely on an account tied to multiple tenants), use the device-code flow instead, which sidesteps that:
az login --tenant <your-tenant-id> --use-device-code.
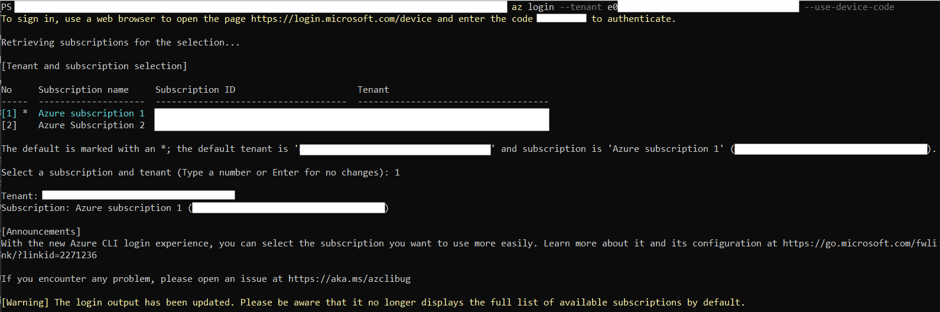

Then set the Application Settings, which become the environment variables the script reads (just prepare this command in a notepad and then paste it in the powershell session).
az functionapp config appsettings set --name <your-function-app-name> --resource-group <your-resource-group> --settings `
  TENANT_ID="<your-tenant-id>" `
  CLIENT_ID="<your-app-registration-client-id>" `
  KEY_VAULT_NAME="<your-key-vault-name>" `
  KEY_VAULT_SECRET_NAME="<your-secret-name>" `
  TARGET_GROUP_ID="<your-target-group-object-id>" `
  TARGET_APP_NAME="<exact-app-displayName-from-detectedApps>"
If you have configured it successfully you should see something like the below.
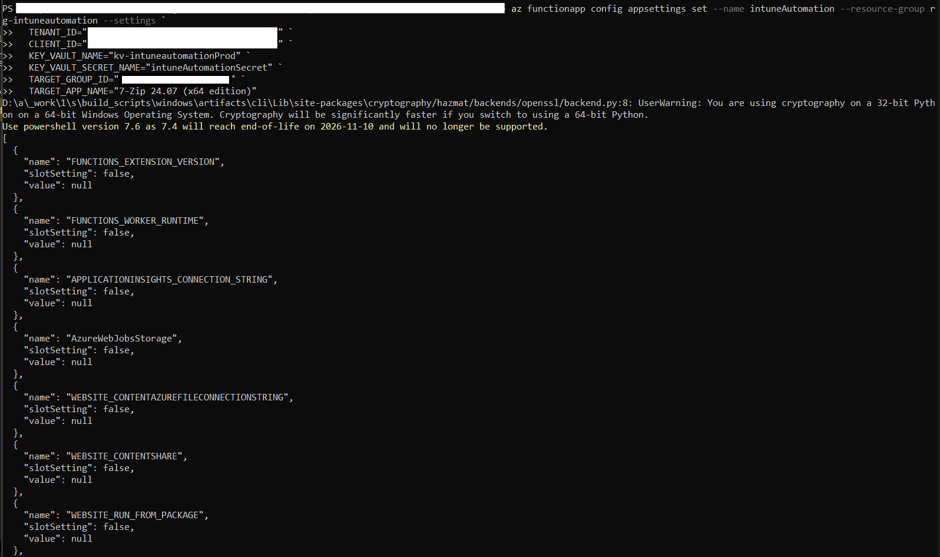
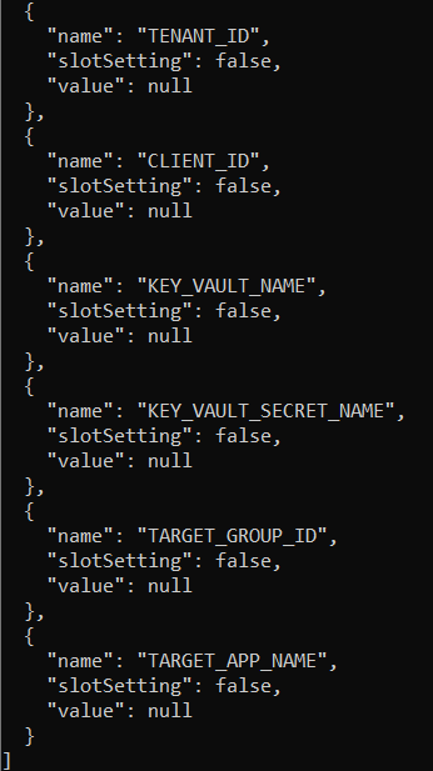
In the Azure function itself we can also check the values there.
The null values in the JSON output above are expected – the Azure CLI deliberately omits the actual values you set from its response, so every value field shows as null. If the command completed without an error, the settings were applied successfully. The portal view confirms the keys are present.
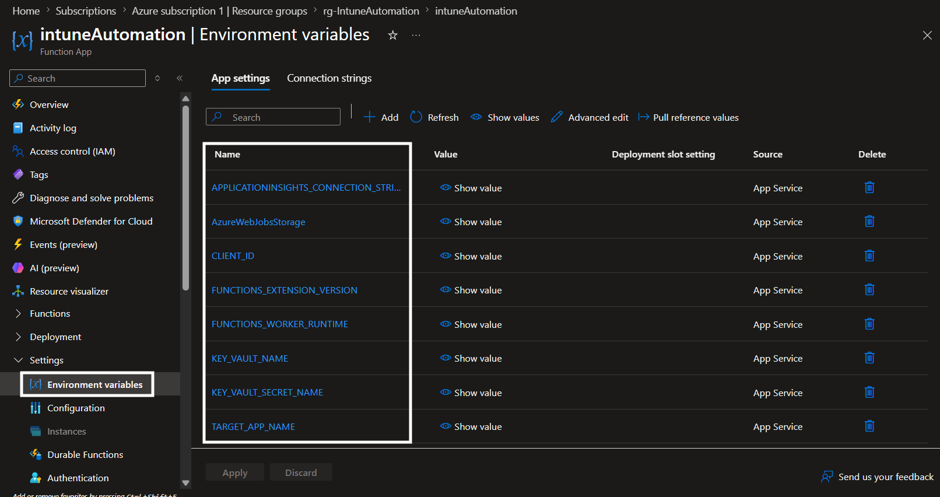
For TARGET_APP_NAME, go to Intune admin center -> Apps -> Monitor -> Discovered apps, and copy the exact display name of an app you know is installed somewhere in your tenant. A mismatched string here is the single most likely reason the Function reports zero matches on its first run.
Step 11: Testing it for real
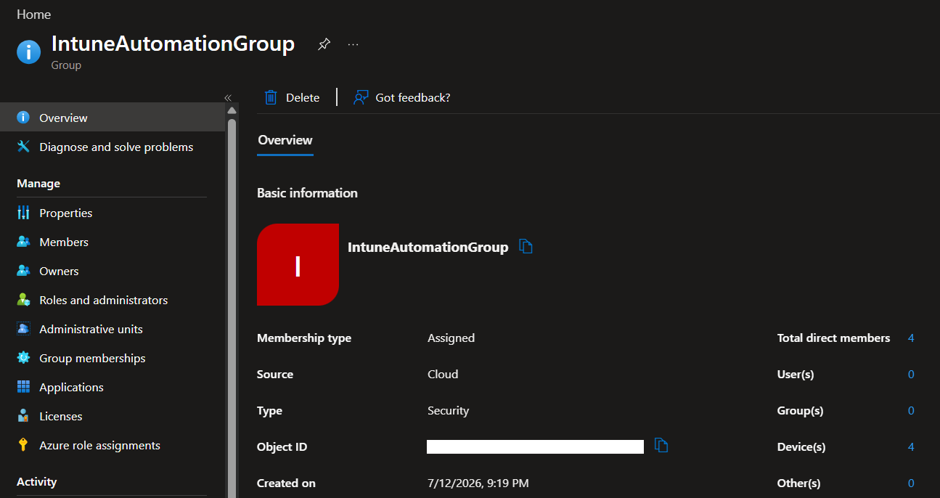
Lets check the group and its members.
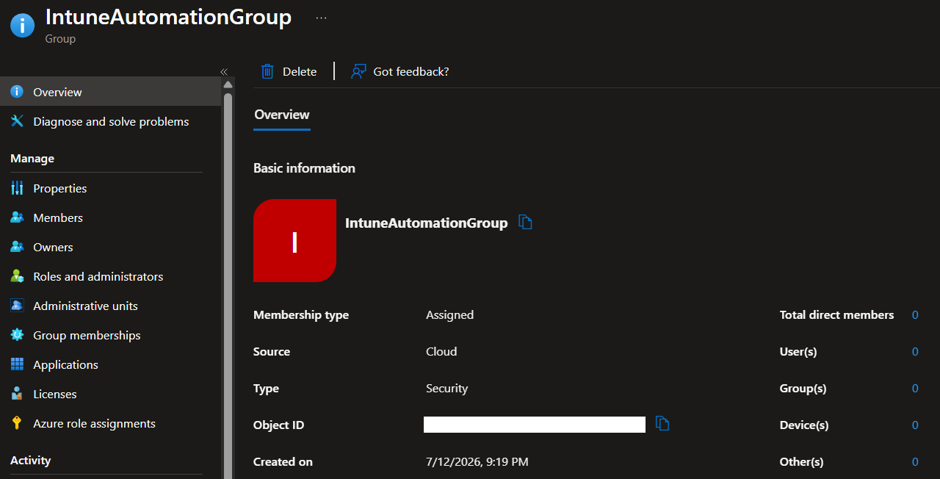
As we can see it’s empty.
Trigger it manually rather than waiting for the schedule: Function App -> Functions -> intuneAutomation -> Code + Test -> Test/Run -> Run.
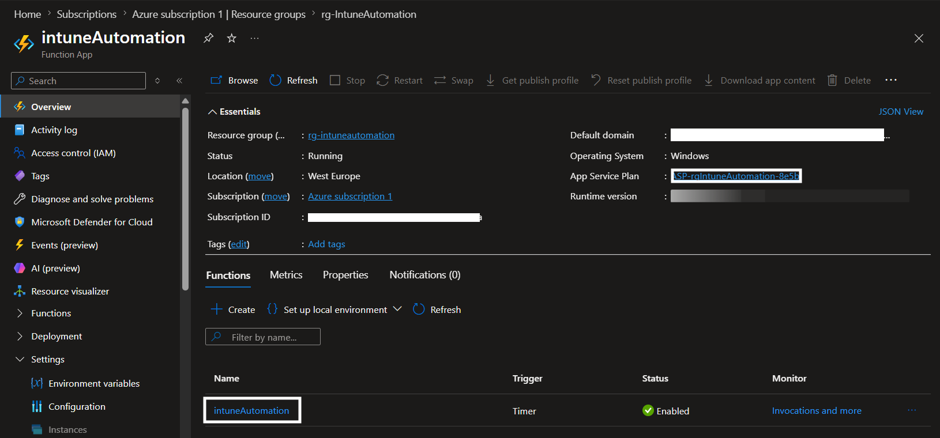
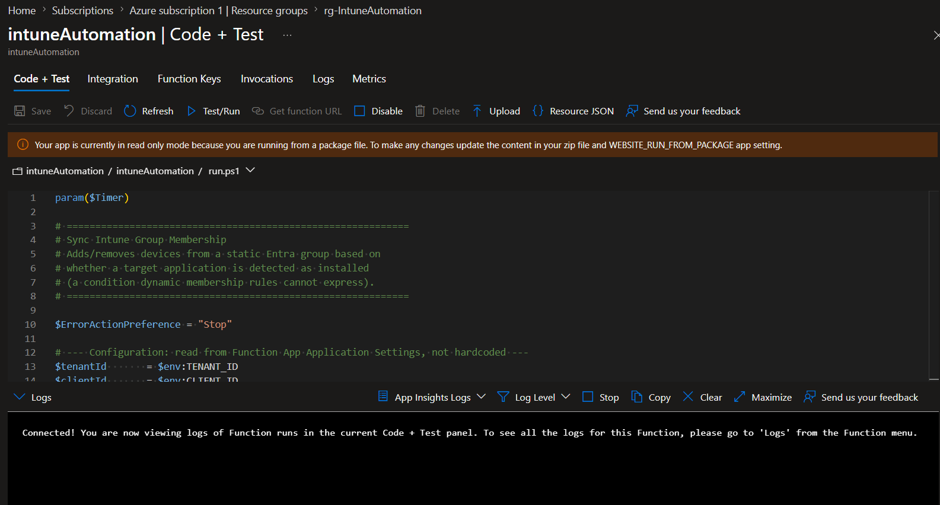
The warning “Your app is currently in read only mode because you are running from a package file.” is expected behavior after publishing with –powershell (WEBSITE_RUN_FROM_PACKAGE=1 is set automatically).
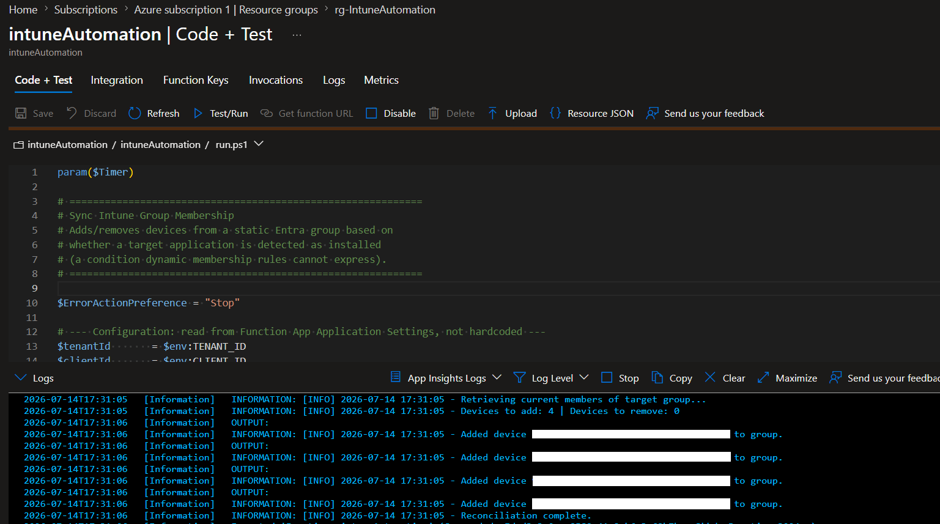
If we check the group again it is populated.
One thing worth testing deliberately rather than assuming: a run that reports zero adds and zero removes hasn’t actually exercised the write paths at all. Force a real change once, either by removing a device from the group manually and confirming the next run re-adds it, or by pointing TARGET_APP_NAME at something not installed anywhere and confirming existing members get removed. Both directions need to be seen working at least once before trusting this unattended.
Querying execution history in Application Insights
Application Insights stores each execution’s log output as traces. To review past runs, go to Function App -> Application Insights -> Logs and run:
traces
| where timestamp > ago(7d)
| where message contains "[INFO]" or message contains "[WARN]" or message contains "[ERROR]"
| order by timestamp desc
This returns the full log output from every execution in the last 7 days, in reverse chronological order. Replace ago(7d) with ago(30d) to look further back, or add | where message contains “ERROR” to narrow to failures only.
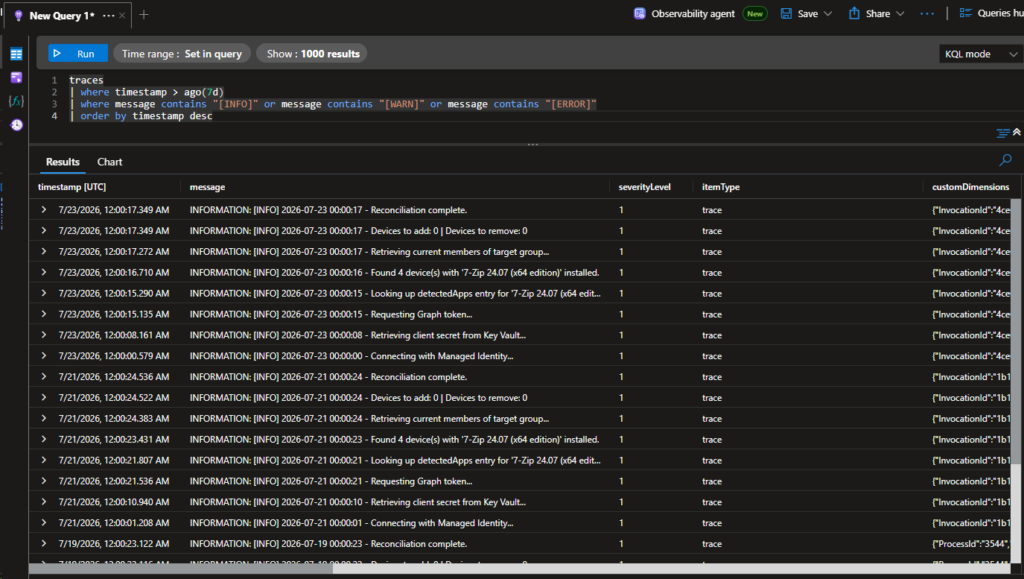
Wrapping up the series
That’s the whole thing, end to end: the gap dynamic groups can’t close, the cloud-only architecture that closes it without touching a single endpoint, and the actual working implementation, bugs and all. If you build a variation of this against a different Graph-queryable property from Part 2’s generalization table, or you hit a pitfall not covered above, that’s genuinely useful to hear about; this series was written from what actually broke while building it, not from a clean happy path, and the next person’s rough edge is probably different from these eight.
Related reading: Entra ID Dynamic Groups Can’t Query Installed Software is Part 1 of this series, and Azure Function Intune Automation: An interesting Cloud-Only Architecture is Part 2, covering the design decisions this implementation follows.