Privileged Identity Management (PIM) in Microsoft Entra ID: A Complete Guide
Learn how to implement Microsoft Entra PIM with built-in roles, custom roles, and PIM for Groups. Step-by-step guide covering activation settings, access reviews, security alerts, and best practices to eliminate standing access.
Note: This is not my typical Intune-focused post. Think of it as a security and identity governance deep dive – though as you will see throughout, PIM connects directly back to Intune, endpoint management, and every privileged role in your tenant.
If your admins still carry standing Global Administrator, Intune Administrator, or Security Administrator assignments – meaning the role is always active, 24/7, no activation required – you have a standing access problem. And standing access is one of the most exploited attack vectors in enterprise identity today.
Privileged Identity Management (PIM) is Microsoft’s answer to that problem. It is a service inside Microsoft Entra ID that ensures no one carries permanent privileged access unless there is an explicit, audited, and time-bound reason for it. This post walks through what PIM is, why enabling it is non-negotiable in 2026, and how to configure it correctly across built-in roles, custom roles, and groups – with step-by-step instructions you can follow directly in your tenant.
Table of Contents
Why Standing Access Is the Problem PIM Solves
Think about what a standing Global Administrator account actually means in practice. Your admin signs in every morning to handle tickets, deploy Intune policies, and manage Conditional Access. Their account is a Global Admin at 9am when they are doing legitimate work, at 2pm when they stepped away from the keyboard, at midnight when they are asleep, and at 3am when an attacker who stole their session token or credentials is quietly exfiltrating data, creating backdoor accounts, or disabling security policies – and no alert fires because the access itself looks legitimate.
Standing access means a compromised account is immediately a compromised tenant, with no additional steps required from the attacker. The role does not care who is using it or why. It is simply always there.
This is not a hypothetical risk. Privileged accounts like Global Administrators, Security Administrators, and Intune Administrators are the primary targets in enterprise identity attacks precisely because compromising one of them removes every other barrier. And the most dangerous thing about standing privilege is that it requires zero escalation from the attacker once they have the credentials. They walk in through the front door with full keys.
According to Microsoft’s documentation on what PIM is, organizations want to minimize the number of people who have access to secure information or resources, because that reduces the chance of a malicious actor gaining access or an authorized user unintentionally impacting a sensitive resource. PIM addresses this by replacing standing access with just-in-time access: a user is made eligible for a role, and they can only use that role after explicitly activating it, providing justification, and in many cases completing MFA or waiting for approval. The elevated access expires automatically when the configured time window ends.
The key features PIM provides, as documented by Microsoft, are just-in-time privileged access, time-bound access with defined start and end dates, approval-based activation, MFA enforcement at activation, justification requirements, notifications when roles are activated, access reviews to ensure eligibility is still warranted, and a full audit history for compliance purposes.
For Intune administrators specifically, this means that instead of your helpdesk lead having a permanent role allowing actions on devices – which gives them unrestricted access to all device configurations, compliance policies, and enrollment settings at all times – they are made eligible for the role and can activate it for a maximum of, say, 4 hours when they need to perform a specific task. When the window closes, the access is gone. Even if their account is compromised the following day, the attacker has no privileged access to Intune.
Licensing Requirements
PIM requires either Microsoft Entra ID P2 or Microsoft Entra ID Governance licensing. It is not available on Entra ID Free or P1. Microsoft Entra ID P2 is available standalone and is included in Microsoft 365 E5, EMS E5, and the Microsoft 365 E5 Security add-on (the usual route for Microsoft 365 E3 tenants). The Microsoft Entra Suite also includes all ID Governance capabilities. You can find the full breakdown of what each license tier includes in the Microsoft Entra ID Governance licensing fundamentals documentation.
Every user who will have a PIM-managed eligible assignment – meaning users who will be activating roles through PIM – needs to be covered by a P2 or Governance license. Approvers who can approve or reject activation requests, and anyone who performs or is subject to an access review, also need to be covered. Admins who only configure PIM settings (such as Privileged Role Administrators without eligible assignments) do not need a license for that alone. This is worth planning before you begin your rollout so you are not caught off guard mid-deployment.
Worth knowing: Microsoft has stated that no new identity governance features will be added to Entra ID P2. Newer PIM capabilities, such as custom extensions for role activation and access reviews of PIM for Groups, require Microsoft Entra ID Governance or the Entra Suite. Also, if your P2/Governance license lapses, eligible assignments are removed and active time-bound assignments become permanent, so don’t let it expire silently.
Core Concepts: Eligible vs. Active Assignments
Before going into the portal steps, it is important to understand the two assignment types PIM operates with, because every configuration decision flows from this distinction.
An eligible assignment means the user has the right to activate a role, but the role is not currently active. To use the role they must explicitly activate it, which may require completing MFA, entering a business justification, and in some cases waiting for an approver to approve the request. Eligible assignments can be permanent (the user is always eligible to activate) or time-bound (the eligibility itself expires on a set date).
An active assignment means the role is always on for that user, with no activation step required. This is equivalent to traditional standing access. Active assignments can also be permanent or time-bound – meaning you can grant someone active access for a defined window, such as covering for a colleague who is on leave, and have it expire automatically.
The goal of a PIM deployment is to convert as many active permanent assignments as possible into eligible assignments. Most administrators do not need their privileged role active around the clock. They need it for specific tasks, at specific times, and PIM enforces exactly that discipline.
| Assignment Type | Requires Activation | Role Active Immediately | Recommended For |
|---|---|---|---|
| Eligible (permanent) | Yes | No | Most admins – day-to-day operations |
| Eligible (time-bound) | Yes | No | Contractors, temporary access |
| Active (permanent) | No | Yes | Emergency accounts only |
| Active (time-bound) | No | Yes | Temporary coverage, projects |
PIM with Built-in Roles
Built-in Microsoft Entra roles are the roles Microsoft ships by default – Global Administrator, Intune Administrator, Security Administrator, Privileged Role Administrator, User Administrator, and so on. PIM can manage all of them. The full list of roles supported in PIM is documented by Microsoft, though it is worth noting that classic subscription administrator roles are not supported. Workload-native roles such as Exchange Online role groups and Intune RBAC roles are not Entra roles and aren’t managed directly (PIM for Groups is the workaround, covered below).
The configuration process for any built-in role in PIM has two distinct steps: first you configure the role settings (which define the rules for activation), and then you assign eligible users to the role.
Step 1: Configure Role Settings
Role settings are where you define the activation requirements that apply to everyone assigned to a particular role. You configure these per role, so you can have stricter settings for Global Administrator than for, say, Reports Reader.
- Sign in to the Microsoft Entra admin center as at least a Privileged Role Administrator.
- Navigate to ID Governance -> Privileged Identity Management -> Microsoft Entra roles.
- Select Roles from the left menu to see the full list.
- Select the role you want to configure – for example, Intune Administrator.
- Select Role settings.
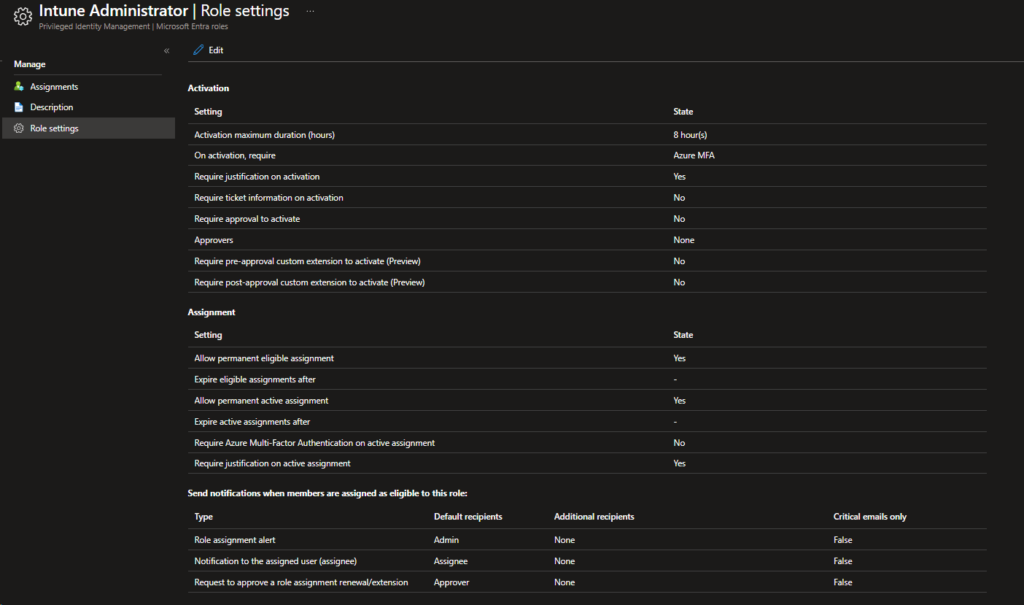
- Select Edit to open the role settings panel.
Inside the settings panel you will see several key configuration options that are worth understanding individually.
Activation maximum duration (hours) sets the longest time window a user can activate the role for in a single activation. A sensible starting point for high-privilege roles is 4 hours. For Global Administrator, 1-2 hours is a better starting point. The user chooses their own duration at activation time, up to this maximum. The configurable range is 1 to 24 hours.
On activation, require is where you enforce what the user must do before the role becomes active. You can require MFA, require justification (a text field explaining the business reason), and require a ticket number from your ITSM system such as ServiceNow (free text only; PIM doesn’t validate it against the ticketing system). For any sensitive role, you should enable at minimum MFA and justification. These two controls together mean that even if an attacker activates the role through a compromised account, you have an MFA challenge in the way and a logged justification entry that will look anomalous in the audit trail.
One caveat on the MFA option: if the user already satisfied MFA earlier in their session (or signed in with Windows Hello for Business), they may not be prompted again at activation. If you want a guaranteed step-up, use the On activation, require Microsoft Entra Conditional Access authentication context option instead.
Create an authentication context, target it with a Conditional Access policy that requires a phishing-resistant authentication strength (and optionally a compliant device), and set sign-in frequency to “Every time”. Create and enable the Conditional Access policy before you reference the authentication context in PIM. Scope that policy to all users or the eligible users, not to the directory role, because the user doesn’t hold the role yet at activation time.
Require approval to activate is the strongest control. When enabled, the user’s activation request is held pending until a designated approver accepts it. This is the appropriate setting for Global Administrator and other tier-zero roles. It adds friction, deliberately – because the friction is the point. Note that if you enable approval and no approver is online or reachable, the user cannot activate. Plan your approvers accordingly and designate at least two. If you leave approvers empty, active Privileged Role Administrators and Global Administrators become the default approvers. If all of those are eligible rather than active, nobody can approve and you are locked out. That is exactly why the emergency access accounts covered later must stay permanently active.
Assignment settings at the bottom of the panel let you control whether permanent active or permanent eligible assignments are allowed at all, and set maximum durations for both eligible and active assignment expiry. Microsoft recommends that for high-privilege roles you do not allow permanent active assignments at all – enforcing an expiry ensures that even if someone forgets to clean up an assignment, it will lapse on its own.
- Once you have configured your settings, select Update to save.
Step 2: Assign Eligible Users to a Role
Once role settings are in place, you assign users as eligible for the role. This is what replaces the traditional “Add assignment” flow that would have given them standing access.
- Still inside Privileged Identity Management -> Microsoft Entra roles, select Roles.
- Select the role you want to assign – again, Intune Administrator as an example.
- Select Add assignments.
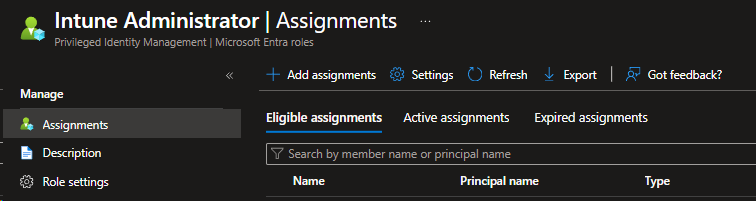
- On the Membership tab, Select No member selected to open the user picker and find the user you want to make eligible.
- On the Settings tab, select Eligible as the assignment type and choose whether this eligibility should be permanent or have an end date. For most scenarios, permanent eligible is appropriate – the user will always be eligible to activate but must always go through the activation process.
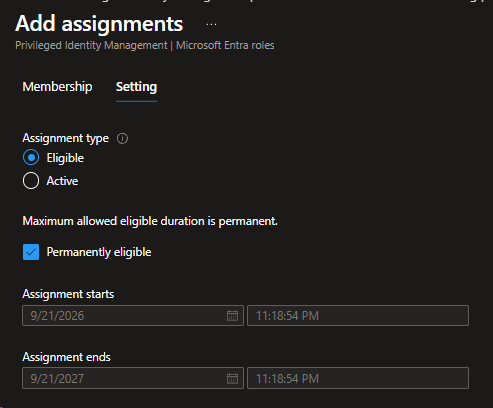
Select Assign to confirm.
The user now appears in the Eligible assignments tab of the role. They have no access to Intune Administrator functions until they explicitly activate the role.
The Activation Experience for the End User
From the user’s perspective, when they need to use a privileged role they navigate to the Microsoft Entra admin center, go to ID Governance -> Privileged Identity Management -> My roles, and select Microsoft Entra roles. Their eligible assignments are listed there with an Activate button.
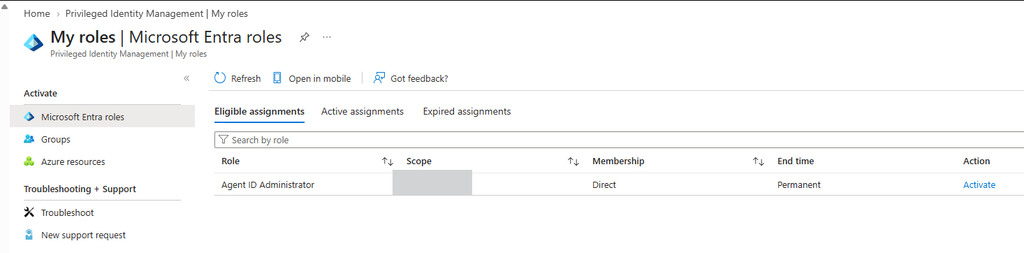
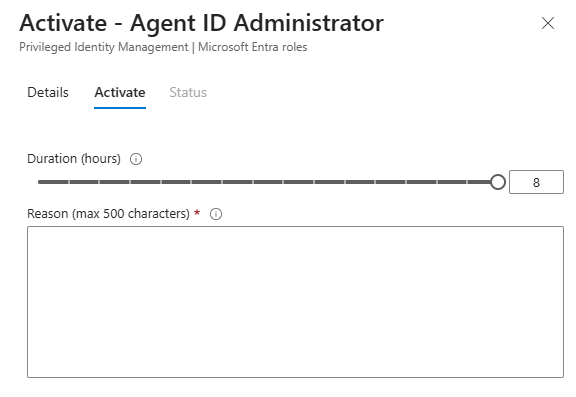
Selecting Activate opens a panel where they choose their activation duration (up to the configured maximum), enter their justification, complete MFA or the Conditional Access step-up if required, and submit the request. If approval is required, they wait – PIM sends an email notification to the designated approvers immediately. Once approved (or if no approval is required), the role becomes active and the user can perform their privileged tasks. When the time window expires, the role deactivates automatically and the user returns to their baseline non-privileged state.
PIM is also available through the Azure mobile app on both iOS and Android, which means admins can activate and approve roles on the go – useful for approval workflows where the approver needs to respond outside of working hours.
PIM with Custom Roles
Microsoft Entra supports custom roles – roles you define yourself with a specific combination of permissions rather than using one of Microsoft’s built-in role definitions. According to Microsoft’s documentation on custom roles, custom roles are useful when none of the built-in roles match the exact permission scope your organization needs. PIM supports both built-in and custom Microsoft Entra roles, as documented in the assign Microsoft Entra roles in PIM article.
The reason to combine PIM with custom roles is that it gives you both scope control and time control. A custom Entra role lets you grant a narrow set of directory permissions, for example managing device objects or reading BitLocker recovery keys, and scope it to an administrative unit. Making a user eligible for that role through PIM means they hold only those permissions, and only for the activation window they request.
The workflow is identical to built-in roles. Create the custom role under Entra ID -> Roles & admins -> New custom role, define its permissions, then configure role settings and eligible assignments in PIM exactly as described above. Custom roles appear in the PIM role list alongside built-in roles.
One important limitation for Intune admins: Entra custom roles cannot contain Intune permissions such as compliance policy, configuration profile, or app management rights. Those live in Intune RBAC, which is a separate role system. You can’t make someone eligible for an Intune RBAC role directly in PIM, but you can get the same result with PIM for Groups (covered next).
Create an Intune custom role, for example read-only on device compliance policies, assign it to a security group under Tenant administration -> Roles, scope it with scope groups and scope tags, and then put that group under PIM for Groups. Your junior admin activates group membership, gains exactly that Intune permission set for a few hours, and loses it when the window closes. This is also the pattern Microsoft recommends in general: use Intune RBAC roles for day-to-day Intune work, and reserve the Entra Intune Administrator role for the few people who genuinely need tenant-wide Intune control.
PIM for Groups
Why PIM for Groups Matters
PIM for Groups is a capability that extends the just-in-time model beyond direct role assignments to group membership and ownership. As Microsoft’s documentation on PIM for Groups explains, groups in Microsoft Entra ID can be used to control access to a wide variety of scenarios – Microsoft Entra roles, Azure roles, Intune, Azure Key Vault, Azure SQL, other application roles, and third-party applications.
This matters for several reasons. First, not every privileged access scenario involves a Microsoft Entra role. Your Intune Scope Tag-based admin groups, your Azure subscription contributor groups – these are all security groups that carry significant access, and none of them are covered by standard PIM for Microsoft Entra roles. PIM for Groups covers them all.
Second, PIM for Groups gives you an alternative path to managing Microsoft Entra role access through groups. Instead of making a user directly eligible for the Intune Administrator role, you create a role-assignable group, assign the Intune Administrator role to that group, and then manage membership of the group through PIM. The end result for the user is the same – they activate their group membership to gain Intune Administrator access – but you gain a scalable, group-centric governance model that is easier to manage at scale.
There is an important technical distinction to understand here. Microsoft’s documentation notes that any Microsoft Entra security group or Microsoft 365 group (except dynamic membership groups and groups synchronized from on-premises) can be enabled in PIM for Groups. However, if you want to assign a Microsoft Entra role to the group, it must be a role-assignable group – a specific group type that can only be created with the Microsoft Entra roles can be assigned to the group property set at creation time, and cannot be changed afterwards.
Even if you never assign an Entra role to a group, Microsoft recommends making it role-assignable when it grants access to sensitive resources, because only Privileged Role Administrators, Global Administrators, or the group’s owners can then change its membership, which stops a Groups Administrator or helpdesk admin from quietly adding themselves. Role-assignable groups also cannot contain nested groups.
Setting Up PIM for Groups Step by Step
Phase 1: Create the role-assignable group
- In the Microsoft Entra admin center, navigate to Entra ID -> Groups -> All groups -> New group.
- Set the group type to Security.
- Give it a descriptive name – for example, PIM-IntuneAdministrators.
- Toggle Microsoft Entra roles can be assigned to the group to Yes. This is the property that makes it role-assignable. You cannot change this later.
- Leave membership type as Assigned (dynamic groups cannot be used here).
- Select Create (check note below).
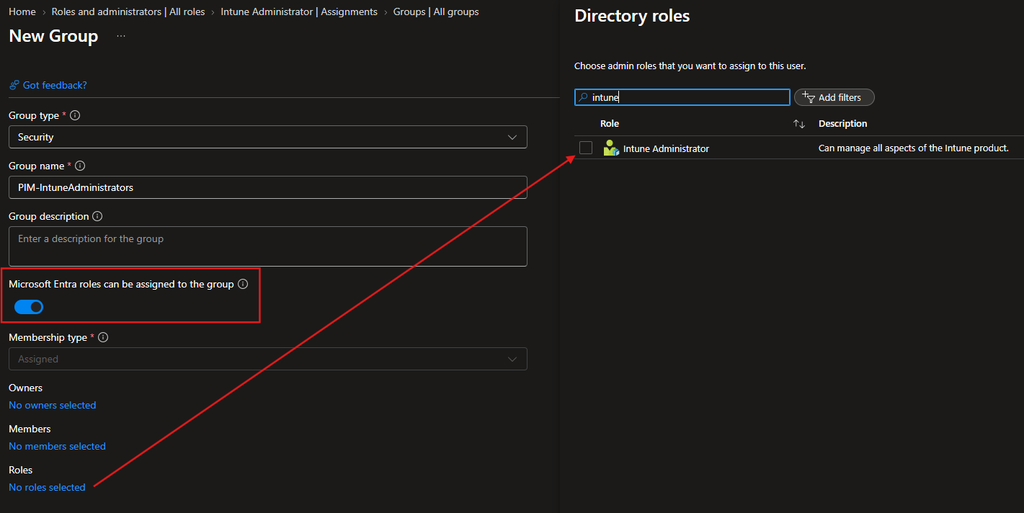
Phase 2: Assign the Entra role to the group (you can also do this while creating the group, check above)
- Navigate to Entra ID -> Roles & admins.
- Find and select the role you want to assign – Intune Administrator in this example.
- Select Add assignments -> Select member.
- Switch the selector to Groups and find your newly created PIM-IntuneAdministrators group (if you switch to Groups it will automatically fetch all PIM-eligible groups). Make it Active and Permanently assigned.
- Assign the role to the group. The group now holds the Intune Administrator role.
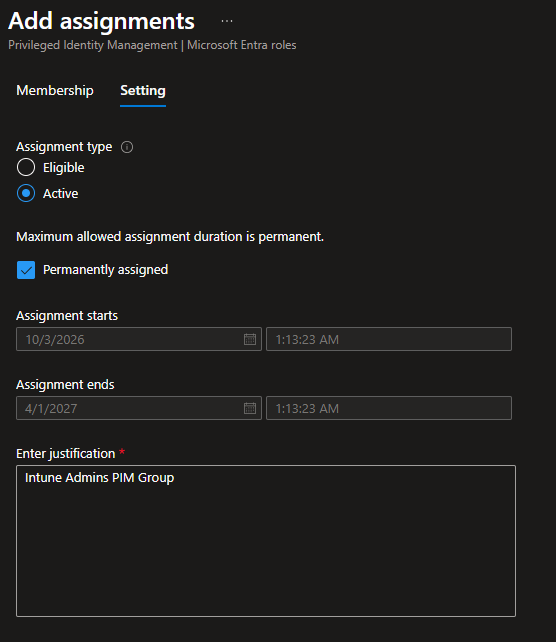
Phase 3: Configure the group in PIM for Groups
- Navigate to ID Governance -> Privileged Identity Management > Groups.
- Search for your PIM-IntuneAdministrators group and select it. In the current portal all eligible groups are listed here directly. Older tenants show a Discover groups button instead, where you select the group and then Manage groups.
- Select Settings, choose the Member role, and select Edit. Configure activation duration, MFA, justification, and approval exactly as you would for a direct role assignment. The Owner role has its own separate policy.
- Select Assignments -> Add assignments, choose the Member role, select Eligible, pick your users, and assign.
Note: a group becomes PIM-managed the moment you give it its first assignment, and that is one-way. You can remove every assignment later, but you cannot un-manage the group.
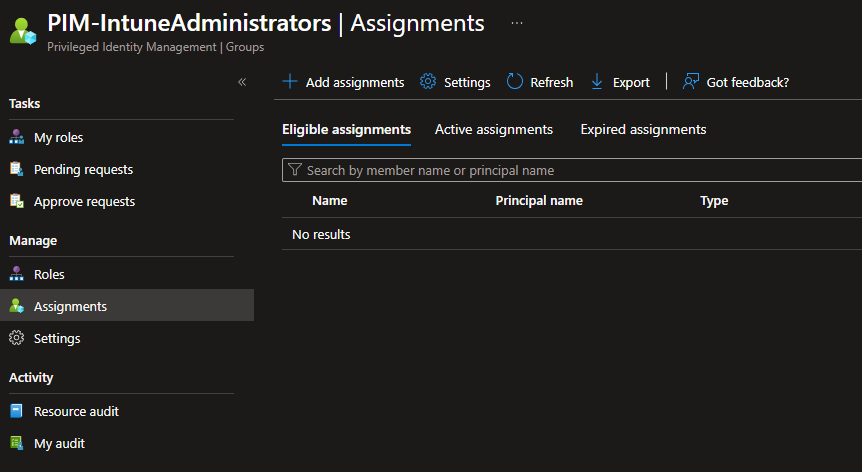
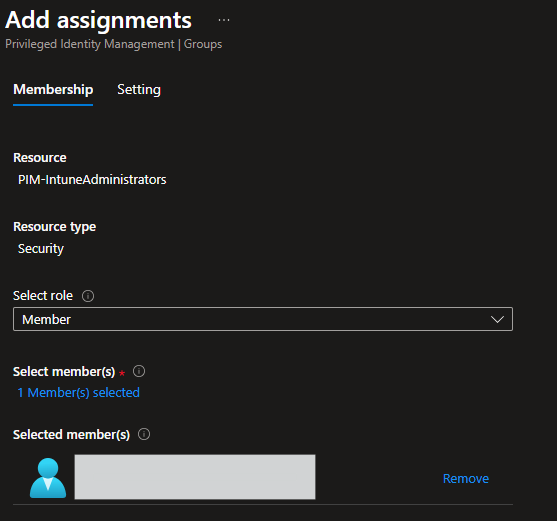
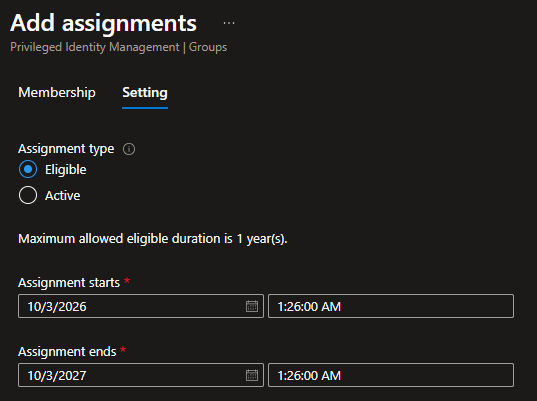
One thing that is easy to get wrong: do not add your admins to the group’s normal Members list under Entra ID -> Groups. A user added there is a permanent member, inherits the role around the clock, and never activates anything, which is exactly the standing access you are trying to remove. The Members list of a PIM-managed group should normally be empty. Everyone goes in as an Eligible member under Assignments in the PIM blade, and PIM adds them to the group for the duration of each activation and removes them afterwards.
From this point, when a user needs Intune Administrator access, they go to PIM -> My roles -> Groups, activate their membership in PIM-IntuneAdministrators, and the group membership – and therefore the Intune Administrator role – becomes active for the configured window. When it expires, they are automatically removed from the group and lose the role.
As Microsoft notes in the PIM for Groups documentation, for groups used for elevating into Microsoft Entra roles, it is recommended to require an approval process for eligible member assignments. Assignments that can be activated without approval can leave you vulnerable when less-privileged administrators are in the chain. Evaluate this recommendation based on your internal processes and security policies.
Access Reviews in PIM
Access Reviews are a PIM-adjacent feature that deserves a mention here because they close the loop on a critical governance gap. PIM controls how access is used. Access Reviews control whether that access should still exist at all.
The scenario they address is straightforward: you make a user eligible for the Intune Administrator role in January because they are leading a device migration project. The project finishes in March. In December, they are still listed as eligible – and nobody has noticed. That stale eligibility is a risk. If the user’s account is compromised, the attacker can activate a role that was never cleaned up.
Access Reviews let you configure periodic review cycles – quarterly, for example – where designated reviewers (specific users or groups, managers, or the users themselves) are asked to confirm whether each eligible assignment is still justified. If you enable Auto apply results to resource and set If reviewers don’t respond to Remove access, denied and unreviewed assignments are removed automatically when the cycle closes. Without those settings, nothing is removed until someone applies the results manually.
You configure Access Reviews for PIM roles from within PIM itself. Navigate to ID Governance -> Privileged Identity Management -> Microsoft Entra roles -> Access reviews -> New (or for PIM-managed groups, ID Governance -> Access reviews -> New access review), select the scope (a specific role or group), set the review frequency and duration, and designate reviewers. The Microsoft documentation on creating access reviews for PIM roles covers the full configuration in detail. If you are serious about identity governance, access reviews are not optional – they are the maintenance layer that keeps your PIM configuration clean over time.
PIM Security Alerts
PIM has a built-in alerting system that monitors for suspicious or unsafe patterns in how privileged access is being used and configured. As Microsoft’s documentation on PIM security alerts explains, when an alert is triggered it appears on the PIM dashboard, and the “Roles are being assigned outside of PIM” alert additionally sends email to Privileged Role Administrators, Security Administrators, and Global Administrators when enabled in alert settings.
You access the alerts under ID Governance -> Privileged Identity Management -> Microsoft Entra roles -> Alerts. From there you can also open Setting to adjust the thresholds for each alert to match your environment.
The key alerts to be aware of and what they signal are the following.
Roles are being assigned outside of PIM fires when someone assigns a privileged role directly through the Entra admin center or Microsoft Graph without going through PIM. This is one of the most important alerts to keep enabled because it catches shadow privilege – a situation where your PIM governance model is being bypassed entirely, intentionally or accidentally. Every legitimate role assignment should flow through PIM. If this alert fires, investigate immediately.
There are too many Global Administrators fires only when two configurable conditions are both met: the number of Global Administrator assignments passes a threshold, and Global Administrators make up more than a set percentage of all role assignments. Microsoft’s best practices recommend keeping Global Administrators to fewer than five. Beyond that number, the attack surface grows and the audit trail becomes harder to manage.
Roles are being activated too frequently flags situations where a user is activating a role more often than the configured threshold suggests is normal. This can indicate that the role activation window is too short and creating friction, or it can indicate that an account is being used in unusual ways.
Administrators aren’t using their privileged roles fires when a user goes longer than the configured number of days (0 to 100) without activating a role. A user who has an eligible assignment they have never used in 90 days may simply no longer need it. This alert prompts you to review and clean up.
Roles don’t require multifactor authentication for activation flags any PIM-managed role where MFA isn’t required on activation. Treat every hit as a configuration gap to close.
Potential stale accounts in a privileged role flags privileged accounts that haven’t signed in for a configurable number of days (1 to 365). These are often forgotten service or shared accounts, which makes them easy targets.
The value of these alerts is that they shift PIM from a set-and-forget configuration into an active monitoring posture. You are not just controlling access – you are watching for signals that the access model is being circumvented or is drifting from what you intended.
Emergency Access Accounts and PIM
Emergency access accounts – commonly referred to as break-glass accounts – sit in a specific relationship with PIM that is worth being explicit about. They are the one case where standing Global Administrator access is not just acceptable but required by design.
Microsoft’s guidance on managing emergency access accounts is clear: these accounts should have a permanently active Global Administrator role assignment, not an eligible one. The reason is fundamental – if your normal admin accounts are locked out because PIM is unavailable, or Conditional Access is misconfigured, or your identity provider is down, you need an account that can authenticate and act without any dependencies. An eligible assignment that requires PIM activation is useless in exactly the scenarios where break-glass accounts are needed.
Microsoft recommends maintaining two or more cloud-only emergency access accounts, permanently assigned the Global Administrator role. All emergency accounts must use the organization’s *.onmicrosoft.com domain – never a custom domain that depends on external DNS or federation. Cloud-only means there is no dependency on on-premises Active Directory, AD FS, or any external identity provider.
How to secure them properly:
Use phishing-resistant, passwordless authentication on all emergency accounts. Passkeys (FIDO2 security keys) are the recommended option, with certificate-based authentication as the alternative if you already run a PKI. This is no longer optional: Microsoft’s mandatory MFA enforcement for admin portals applies to break-glass accounts too, and these methods satisfy it. Store the keys physically in a secure, access-logged location – a safe that requires two people to access, for example. Do not store the credentials in a shared password manager that team members use day to day. Keep each account’s key in a separate location so a single site incident can’t take out all of them.
Give the accounts different authentication methods or key types from each other, and never the same method your day-to-day admin accounts use. The point is that no single failure mode – a lost key, a compromised password manager, a misconfigured MFA policy – should knock out all of them at once.
Exclude these accounts from every Conditional Access policy that blocks or restricts sign-in (report-only policies don’t need the exclusion). The easiest way is a dedicated group such as EmergencyAccess that you exclude consistently. This is the exception to every security rule you apply to everything else in the tenant, and it is a deliberate one. A break-glass account that is blocked by a Conditional Access policy in an emergency is worthless.
Configure a dedicated alert for any sign-in from any of these accounts. These accounts should never be used in normal operations. A single login from a break-glass account should immediately page your security team. Send your Entra sign-in logs to a Log Analytics workspace and create an Azure Monitor log search alert (or a Microsoft Sentinel analytics rule) that fires on any sign-in by those accounts’ object IDs, with severity 0 – Critical.
SigninLogs
| where UserId in ("<object-id-1>", "<object-id-2>")
| project TimeGenerated, UserPrincipalName, IPAddress, ResultType, ResultDescription
Validate the accounts at least every 90 days, and again whenever someone with access leaves or changes role. A break-glass account that has not been tested is a break-glass account that may not work when you need it most.
Best Practices
Bringing everything above together into a practical deployment posture:
Eliminate permanent active assignments for privileged roles. Start with an audit of your current role assignments under Entra ID -> Roles & admins. Every admin who does not strictly require always-on access – which is almost everyone – should be converted to eligible. The only exceptions are emergency access accounts and any service-level dependencies that cannot authenticate interactively.
Require MFA and justification for all eligible role activations. These two controls together give you authentication assurance and an auditable reason for every elevated access event. For your most sensitive roles like Global Administrator and Privileged Role Administrator, add approval on top of that.
Use authentication context for tier-zero roles. Replace plain “require MFA” with Conditional Access authentication context plus a phishing-resistant authentication strength, so every activation is a real step-up.
Keep the number of Global Administrators below five. Microsoft’s guidance puts the target at fewer than five Global Administrators. Beyond that number, the blast radius in a compromise expands significantly and oversight becomes harder. If your organization has grown accustomed to handing out Global Admin “just in case,” PIM’s eligible model is the forcing function that breaks that habit – the role is always available to those who are eligible, they just have to ask for it.
Use PIM for Groups to govern non-role access. Not everything sensitive is a Microsoft Entra role. Your Conditional Access exclusion groups, your Intune admin scope groups, your Azure subscription owner groups – put them under PIM for Groups. The governance model should cover all privileged access, not just the access that happens to flow through a named Entra role.
Enable all PIM security alerts and review them on a schedule. At minimum, the “Roles are being assigned outside of PIM” alert should be treated as a high-severity finding every time it fires. Set a recurring calendar block – weekly is reasonable – to review the PIM alert dashboard and the audit logs.
Run access reviews quarterly. Eligible assignments that are never cleaned up become the same risk as standing access over time. Quarterly reviews configured to auto-apply results and remove access when reviewers don’t respond keep the eligible list accurate without requiring manual effort from administrators.
Test your emergency access accounts regularly. Put it in your quarterly checklist. Sign in with each break-glass account from a test scenario, confirm they can access the tenant and perform administrative actions, and log the test. A break-glass account you have not validated in 90 days is one you cannot rely on in an actual emergency.
Plan your PIM rollout in stages. Microsoft’s deployment planning guidance recommends starting with a pilot group and rolling out to Global Administrators first, then expanding to other privileged roles. Communicate with your admins before the switchover – the first time an admin tries to access Intune and discovers they need to activate a role is not the moment you want them to learn what PIM is.
Pair PIM with Intune Multi Admin Approval. PIM controls when someone holds Intune privileges. Multi Admin Approval (Tenant administration -> Multi Admin Approval) controls what they can do with them, by requiring a second admin to approve high-impact changes like app deployments, script deployments, or device wipes. Together they close the gap where a single activated account can push a destructive change to your entire fleet.
Summary
PIM is one of those controls that looks optional right up until the moment something goes wrong – and then it looks like the thing you should have done two years ago. Eliminating standing privileged access, enforcing just-in-time activation with MFA and justification, governing group-based access through PIM for Groups, monitoring with security alerts, and running regular access reviews together form a governance layer that dramatically reduces your exposure from both external attackers and internal misuse.
It requires Entra ID P2 or ID Governance licensing, it requires a deliberate rollout, and it will add a small amount of friction to your admins’ daily workflows. That friction is intentional. It is the difference between a role being used because someone needs it and a role being exploited because it was simply always there.
References
- What is Microsoft Entra Privileged Identity Management
- Plan a Privileged Identity Management deployment
- Assign Microsoft Entra roles in Privileged Identity Management
- Activate Microsoft Entra roles in PIM
- Configure Microsoft Entra role settings in Privileged Identity Management
- Privileged Identity Management (PIM) for Groups
- Bring groups into Privileged Identity Management
- Roles you can’t manage in Privileged Identity Management
- Configure security alerts for Microsoft Entra roles in Privileged Identity Management
- Create an access review of Azure resource and Microsoft Entra roles in PIM
- Manage emergency access accounts in Microsoft Entra ID
- Best practices for Microsoft Entra roles
- Securing privileged access for hybrid and cloud deployments in Microsoft Entra ID
- Microsoft Entra ID Governance licensing fundamentals
- Role-based access control (RBAC) with Microsoft Intune